

I'm certain that most of our students already have a good grasp on how the Sony PlayStation works, since we speak about the PS1 hardware and the console's rasterization logic in many of our lectures. That being said, this blog post will be a beginner-friendly review on PS1 graphics that I hope even those with no experience programming for the PS1 can follow.
Differently than the majority of other articles that cover this topic, we'll try to approach it from a programmer's perspective. We are not only interested in visualizing these PS1 artefacts with examples of games, but also fully understand the hardware & design limitations that cause these graphical issues to exist in the first place.

This blog post is a companion reading resource for this Youtube video covering the same topic. Some students prefer to read instead of watching a video lecture, so this way you can choose the media style you like the most.
PlayStation Graphics Artefacts
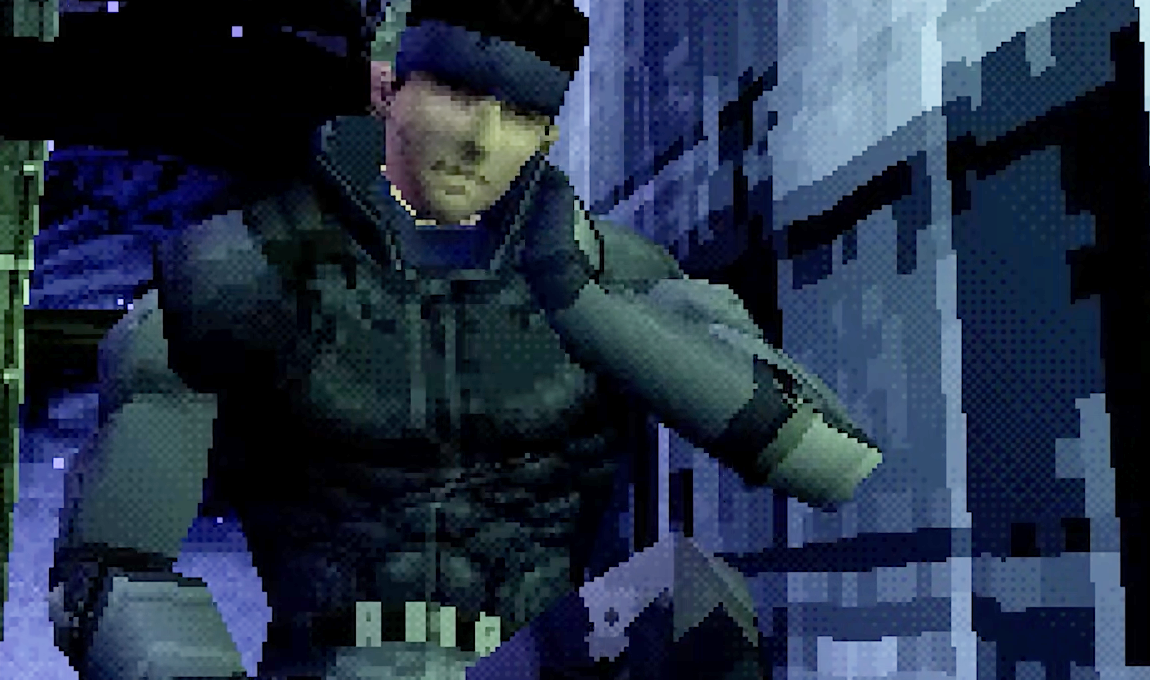
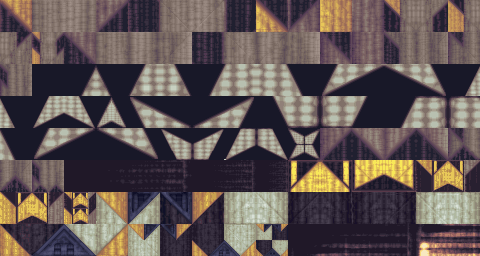
It is not difficult to find modern games developed using modern engines trying to emulate the look of the PlayStation era. Low resolution & lo-poly meshes are the easy items to spot, but there is a lot more to PS1-style visuals than just that.
When we speak about the "PS1 look" we are talking about how triangles are rasterized, how textures behave, how pixels move, and many other important graphics details that are connected to how the console was designed and the limitations that come with it.
The main artefacts and design decisions that we'll cover in our article are:
- Texture wobbliness
- Polygon jittering
- Lack of depth-buffer
- Near-clipping
- Lack of FPU
- T-junction gaps
- Lack of mipmapping
- Dither
Of course, some of the items above are connected to each other. For example, we'll see that the lack of z-buffer is connected to why textures wobble on the PS1, and that the lack of FPU can help explain why T-junction gaps might appear in our polygons. That being said, let's cover each item individually and create these connections as we go.
Most videos and blogs will cover at least the first 2 items; they will talk about texture warping and about jittery polygons, but they don't go too deep in their explanations of why those effects appear. I believe a more comprehensive look into why these things happen is important. So, with these motivations out of the way, let's start dissecting how and why these artefacts happen.
PS1 Hardware Specs
We'll start by taking a very high-level snapshot of the PlayStation hardware that is related to graphics. Looking at these components and some of the design decisions made by Sony might give us some clues on why things work the way they do on the PS1.
CPU
The PlayStation CPU is a 33.86 MHz R3000A with a 32-bit MIPS ISA. Differently than previous 16-bit consoles like the Sega MegaDrive or the Super NES that were both based on CISC architecture, the PlayStation uses a MIPS ISA based on RISC.
RAM
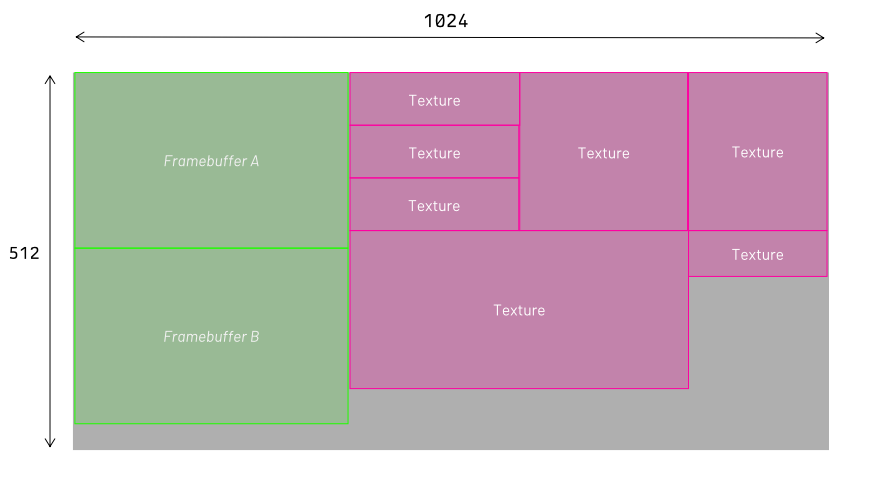
The PlayStation has only 2 MB of RAM. All the variables, arrays, buffers, 3D vertices, meshes, enemies, and all game information must be squeezed into just 2048 KB. Some games found smart ways of dynamically loading chunks of data from the CD as time goes by to overcome the 2 MB limitation, but still, 2 MB is all we have to work with at a given time.
VRAM
The PlayStation also has 1 MB of video ram. In this 1 MB we need to store the actual frame buffer that will be displayed in the screen and also the textures that will be used by the game.
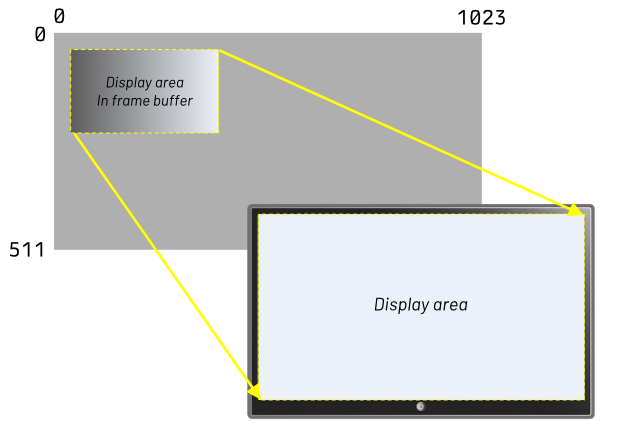
Remember that most games work with double-buffering, so we must reserve space for two framebuffer areas inside VRAM. The remaining area can be used to store textures and color palette information.
Coprocessors
The PlayStation comes with two coprocessors that support the main CPU in performing important tasks. The first coprocessor is the CP0, which is the "System Control Coprocessor"; it controls memory management, system interrupts, exception handling, and breakpoints. But the coprocessor that we are mostly interested in this article is the CP2, popularly called the Geometry Transformation Engine (GTE).
The GTE performs high-speed vector and matrix math. All these vector and matrix multiplication helps us achieve important graphics transformations like rotation, translation, projection, and lighting.
GPU
Finally, the GPU is the chip responsible for 2D rasterization. I want to really emphasize the "2D" part of this sentence because the PlayStation GPU can only draw 2D objects. The reason why I'm stressing this point is because this detail will help us explain some of the graphical artefacts on the PS1 very soon. So, keep that in mind! The PlayStation GPU is a 2D rasterization engine.
Drawing Primitives
The PlayStation GPU knows how to draw a set of native primitives:
- Flat-shaded polygons
- Gouraud-shaded polygons
- Textured polygons
- Lines
- Sprites
Flat-shaded polygon
Polygons on the PlayStation can be either triangles (3 vertices) or quads (4 vertices). A flat-shaded polygon is always painted with a single solid color.

Gouraud-shaded polygon
We can also define triangles or quads with a different color value per vertex. This is called Gouraud shading and it's was used extensively in games from the 90s and 2000s.
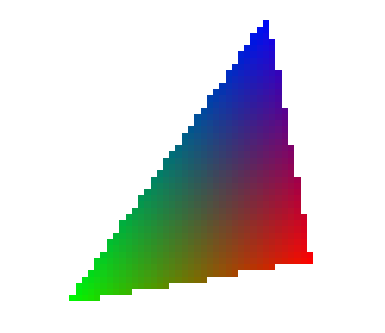
Once we define a color for each vertex of the triangle (or quad), the GPU then proceeds to interpolate the color value for every pixel inside the polygon.
The colorful triangle above might look unappealing at first, but many PS1 games took advantage of this technique to achieve interesting results. Games like Final Fantasy VII, Crash Bandicoot, and Spyro the Dragon used Gouraud polygons to create smooth-shaded characters without textures.
Textured polygons
And, of course, the PlayStation was also able to map a texture image into a polygon using UV coordinates. The image of the texture must be already loaded into VRAM space before we try to texture a polygon with it.
Lines
Moving away from polygons, the PS1 can also rasterize simple lines between two screen coordinates (2D points).

Sprite
Another very popular primitive used in many PlayStation games are sprites, which are basically textured tiles with a position (x,y) and dimensions width & height. Since we are talking about a textured sprite, the texture image must be already loaded in VRAM space before we use it. As one would expect, this was a popular primitive choice for 2D games.
Sending Primitives to the GPU
For us to fully understand how PlayStation graphics flow, let's take a look at how we can instruct the GPU to draw primitives into the framebuffer. Let's also simplify our problem and tell the GPU to draw a simple flat-shaded triangle on the screen.
The VRAM on the PlayStation is not memory mapped, and the only way we can draw primitives in the framebuffer is by asking the GPU to do so. To draw a flat-shaded triangle on the screen we must send a command to the GPU telling the primitive type we want to draw and passing some parameters (position, color, etc.). Once again, the GPU is the one responsible for drawing (rasterizing) our polygon in the framebuffer.
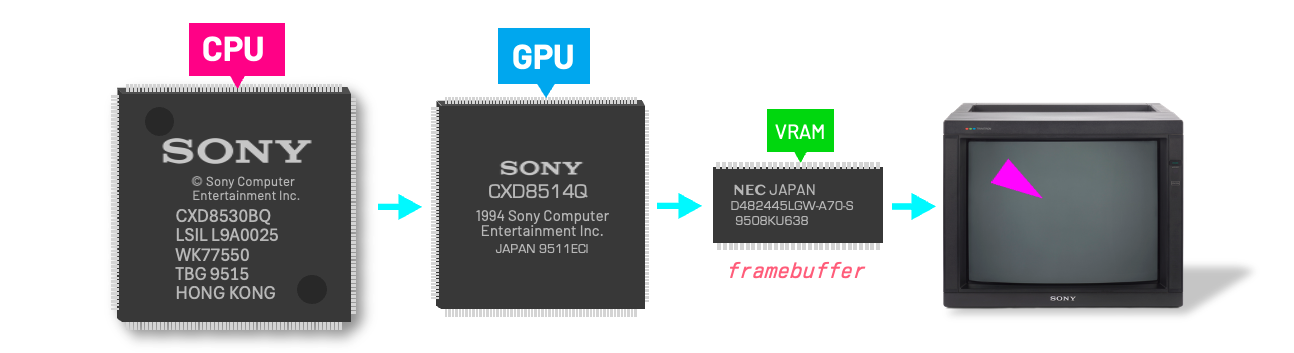
The way we send values to the GPU is by using a series of packets. Packets on the PlayStation are words (32-bit values) that are send in sequence and tell the GPU what to draw. In the example below, we are sending multiple packets that tell the GPU that we want to draw a magenta flat-shaded triangle with three vertices at given x and y screen coordinates. Luckily, this transfer of packets was often performed using fast DMA.
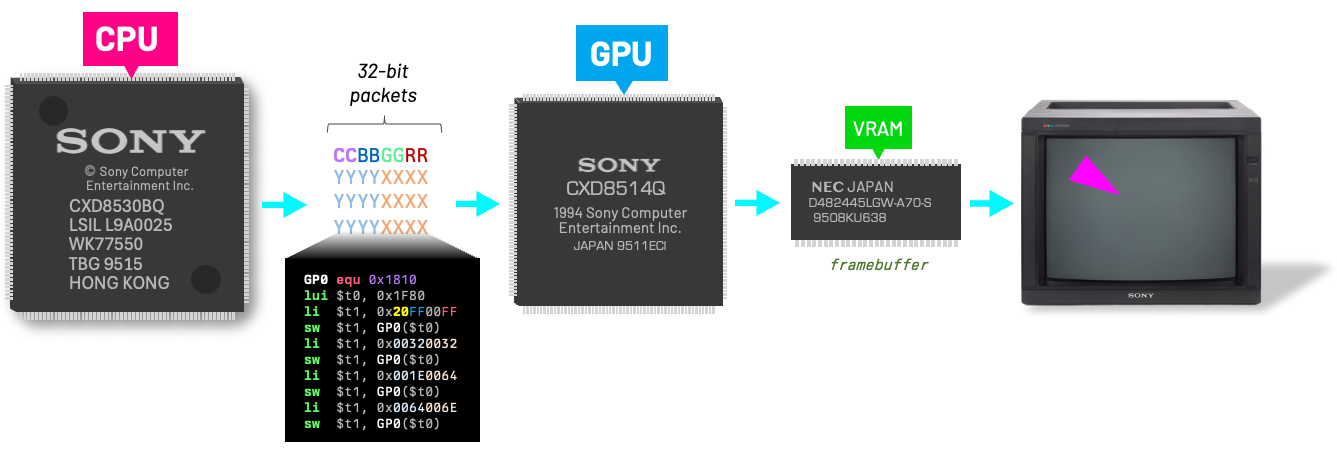
The GPU port that receives these packets is memory-mapped to address 0x1F801810. The following MIPS assembler snippet shows how sending these packets to the GPU is basically a sequence of load and store instructions to a memory-mapped GPU I/O port.
GP0 equ 0x1810
SendPacketsToGPU:
lui $t0, 0x1F80
li $t1, 0x20FF00FF
sw $t1, GP0($t0)
li $t1, 0x00320032
sw $t1, GP0($t0)
li $t1, 0x001E0064
sw $t1, GP0($t0)
li $t1, 0x0064006E
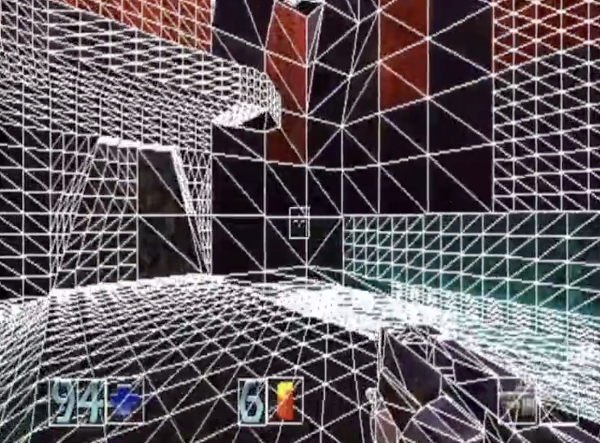
sw $t1, GP0($t0)Pay attention how when we send the parameters for the polygon to be drawn, our coordinates are all in 2D. We have no access to the z component (depth) at this stage of the rasterization. And the reason I mention this is because this lack of depth information at the rasterization stage is one of the main culprits for the PS1 textures to wobble.
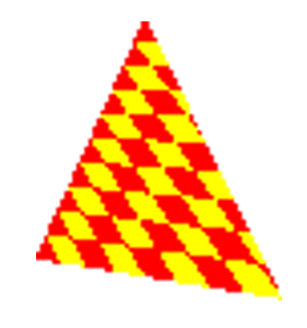
Wobbly Textures
To fully understand why the lack of a depth buffer causes textures to warp on the PlayStation, let's first quickly review how texture mapping works in computer graphics.

Mapping textures into polygons is often done using a technique called inverse texture mapping. In this approach, for each pixel, we try to figure out which color from the source texture to use. Each vertex of our polygon has a UV coordinate associated with it, mapping the vertex to coordinates in the source image.
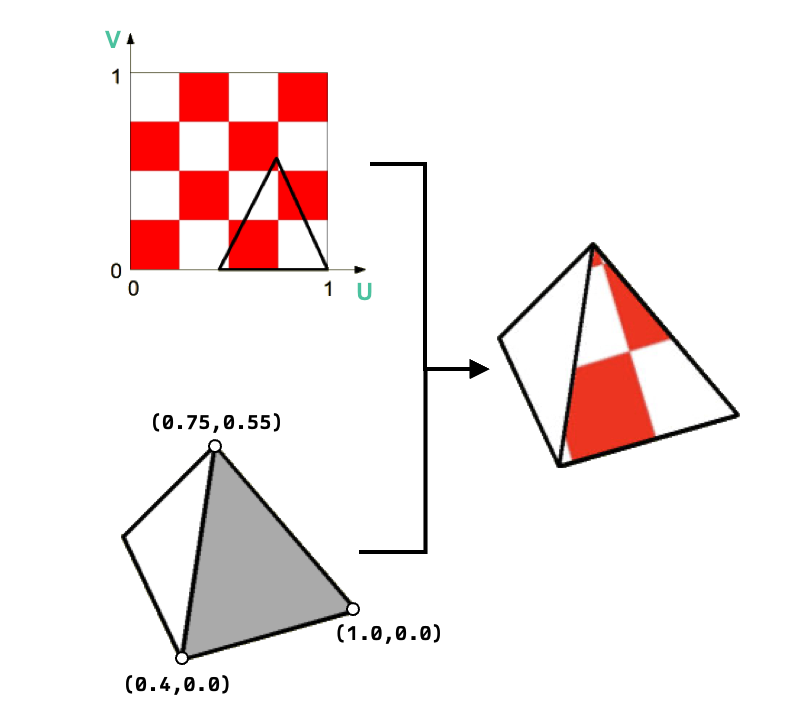
Once we have the UV coordinate for each vertex, the GPU then performs an interpolation of these values inside the polygon for each pixel. This is how the GPU knows what color each pixel in the triangle face must be painted based on the UV for each vertex; it interpolates the UV values and fetches the correct color from the original texture image.
The problem happens if the triangle has perspective applied to it. If the triangle vertices have different depth values, the GPU does not know how to interpolate using perspective-correct interpolation, and can only use affine texture mapping.

The human brain understands that the image above was originally a 3D quad that was rotated, but for the PlayStation GPU these are just 2D geometries without any depth information.
Once we project that polygon from 3D to 2D, the PlayStation loses the depth value per vertex. Without the z component per vertex, the GPU can only
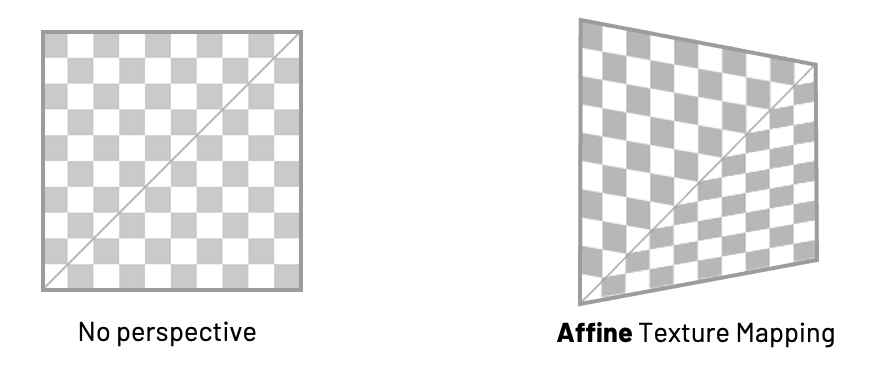
Do you see how the interpolation on the triangles on the right is done linearly? Once again, we know that both triangles were originally a quad that was rotated, but for the PlayStation GPU these triangles are just 2D geometries on the screen without any depth. This is how the PlayStation performs texture mapping, and that is why as our game objects move their textures them appear to warp and wobble.
Perspective-Correct Texture Mapping
What our brain expected to see in this case was an interpolation that takes into account the different depth of the vertices. Such texture mapping is called "perspective-correct" and that's something the PlayStation GPU simply cannot do.
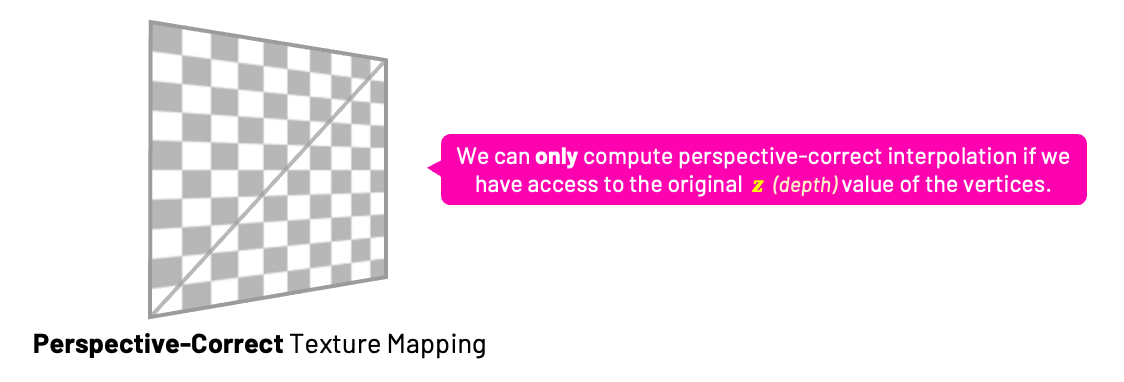
Other game consoles that have a depth buffer can perform perspective-correct texture mapping. This method takes into account the depth per vertex and the interpolation uses that to fetch the color from the source texture to achieve the output that our brains expected to see. Once again, what you see above is not what the PlayStation does.
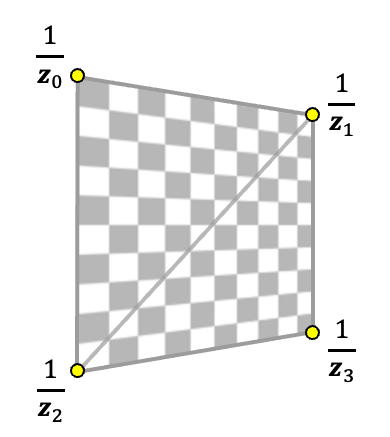
Fun fact: If you ever took our 3D Graphics Programming course, you know that what we really need to perform perspective-correct interpolation is not really z, but its reciprocal \(\frac{1}{z}\). Once perspective projection is computed, the value of z is not linear across the screen, but the reciprocal \(\frac{1}{z}\) is.
GTE and Perspective Projection
Now that we have seen that the GPU has no depth information and that causes the GPU to not be able to perform perspective-correct texture mapping, let's just rewind a bit and talk about the projection stage of the PlayStation graphics flow.
Projection is what effectively transforms our 3D vertices in world space into 2D vertices in screen space. The 3D world before the projection is basically just conceptual and exists only in our minds; it's not until after the projection into 2D that we have a real representation of that conceptual world. There are many types of projection, but the most popular one in game development is called perspective projection.
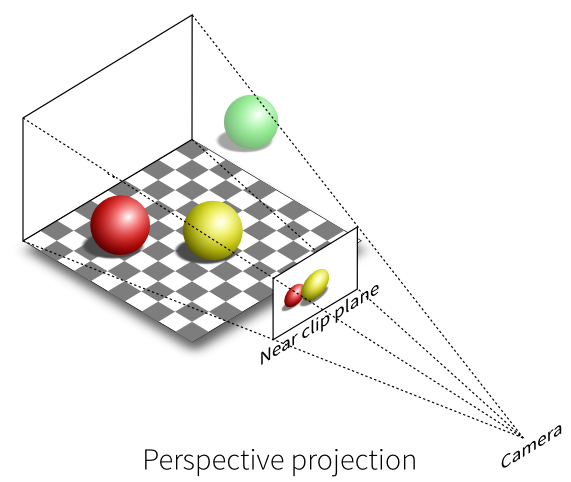
Perspective projection takes into account the depth of the vertices. Using this method, objects that are close to us appear bigger, and objects that are far away appear smaller.
One very important part of the perspective projection is called perspective divide, where we divide the original x and y components by the depth (z).
The resulting projected x on the screen is equal to the original x value divided by the z value, and the final projected y is equal to the original y of the point divided by its z value.
Inversely proportional relationship: Look at the perspective divide formula above. Does it make sense to you intuitively? The fraction creates an inversely proportional relationship between the projected screen values of x and y with the point's depth.
- The bigger the z, the more we divide, and the smaller the resulting x,y is.
- The smaller the z, the less we divide, and the bigger the resulting x,y is.
Things that are far away appear smaller, and things that are close appear bigger!
In the PlayStation, this perspective projection calculation is done by the GTE coprocessor! We can simply load registers of the GTE with the 3 vertices (x,y,z) of a triangle and invoke a special GTE instruction called RTPT (rotation-translation-projection-three). This RTPT command performs a rotation, a translation, and the perspective projection for the three vertices. After the RTPT is done, we can store the results of these calculations in other registers of the GTE and proceed from there.
Below we can see an example of how the RTPT routine works using MIPS assembler. We don't really need to know MIPS to get a high-level understanding of what is going on.
RotTransPers3:
  lwc2 VXY0, ($a0)   ; Input x,y for vertex 1
  lwc2 VZ0, 4($a0)   ; Input z for vertex 1
  lwc2 VXY1, ($a1)   ; Input x,y for vertex 2
  lwc2 VZ1, 4($a1)   ; Input z for vertex 2
  lwc2 VXY2, ($a2)   ; Input x,y for vertex 3
  lwc2 VZ2, 4($a2)   ; Input z for vertex 3
  nop
  rtpt
  lw $t0, 16($sp)
  lw $t1, 20($sp)
  lw $t2, 24($sp)
  lw $t3, 28($sp)
  swc2 SXY0, ($a3)   ; Output screen x,y for vertex 1
  swc2 SXY1, ($t0)   ; Output screen x,y for vertex 2
  swc2 SXY2, ($t1)   ; Output screen x,y for vertex 3
  swc2 IR0,  ($t2)
  cfc2 $v1,FLAG0
  mfc2 $v0,SZ2
  sw $v1,($t3)
  j $ra
  sra $v0,$v0,2
Observe how we first ask for a series of lwc2 instructions (load word coprocessor 2) to load the values of the x, y, and z components of all 3 triangle vertices. This is us loading the registers of the GTE with the values of (x0, y0, z0), (x1, y1, z1), and (x2, y2, z2).
We proceed to issue the RTPT command on the GTE. Soon after, we use the swc2 instruction (store word coprocessor 2) to output the values of the 2D screen coordinates (x,y) for the 3 vertices. The values of SXY0, SXY1, and SXY2 are the screen coordinates x and y after rotation, translation, and perspective projection.
Do you see how we input 3D coordinates (x,y,z) and the output of the GTE gives us 2D coordinates (x,y) in screen space? After this stage, we do not keep the original depth value of the original 3D vertices and the GPU only have access to the 2D screen coordinates for the rasterization in the frame buffer.
Depth Sorting & Ordering Tables
Another visual artefact that is very characteristic of PS1 games is that sometimes polygons pop and appear abruptly based on their depth order.
The animation below shows one example of this depth fighting between polygons. Remember how we send packets to the GPU with primitive information to be displayed? The order that we send those primitive packets is directly related to the order that the primitives are drawn in the framebuffer.
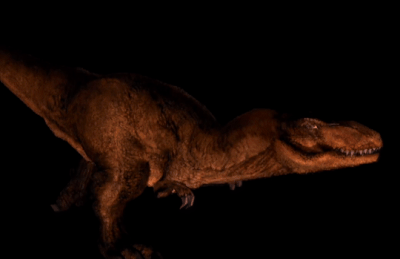
Pay attention to how the polygons in the T-Rex's leg become visible and pop against the polygons in the belly. This artefact is a direct result of how the PlayStation computes the rendering order of the polygons by depth.

In the PlayStation world, sorting the primitives in the correct order to be drawn is done by using a linked-list data structure called Ordering Table. We add primitives to the OT in the order that we must draw them in the framebuffer.
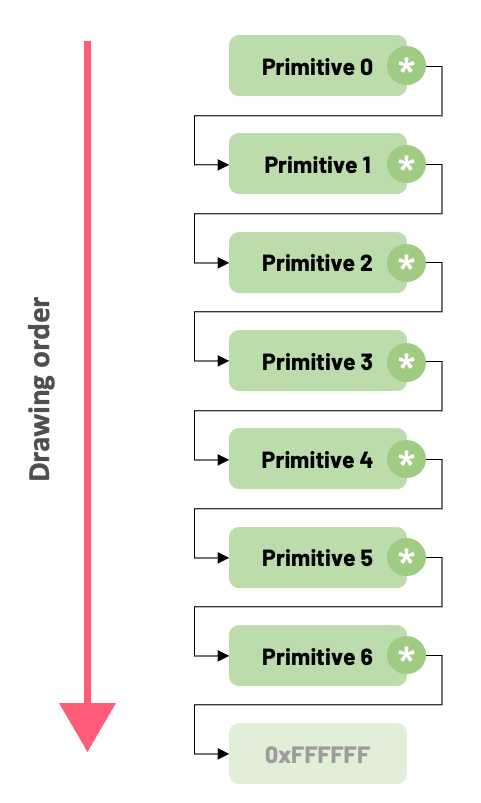
Since most games use polygons and the order that they are displayed depends on their depth in world space, the GTE coprocessor also helps us with that! The GTE has a special instruction that computes the average z values between the vertices of a polygon. The GTE coprocessor will spit out this average depth value, which can then be used as the "index" of where that primitive must be placed in the OT.
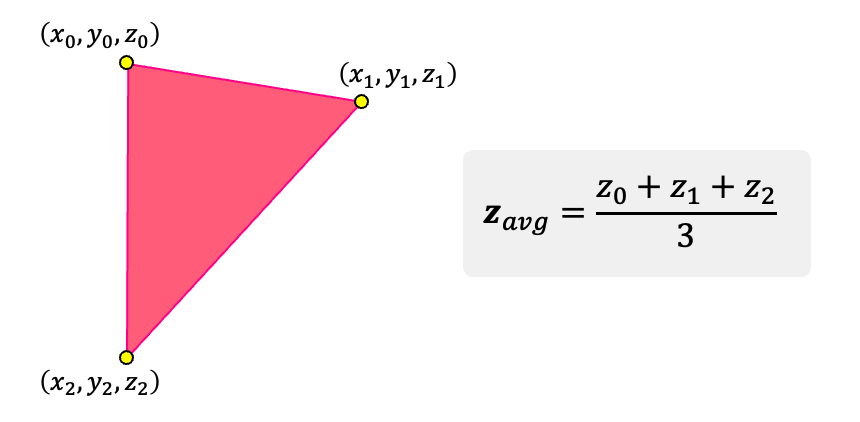
Pay attention that the depth that dictates the drawing order is not per pixel. Instead, we have one single depth per polygon. This is the main reason we see those z-fighting issues when polygons sometimes pop in front of others in the OT. Depending on the configuration of the vertices, the average depth of one triangle will place it in front of another triangle in the OT.
Polygon Jittering
Now that we understood why textures wobble and why polygons might pop in front of others as our game objects move around, I believe it's time we talk about the next popular artefact on PS1 games: jittery polygons.
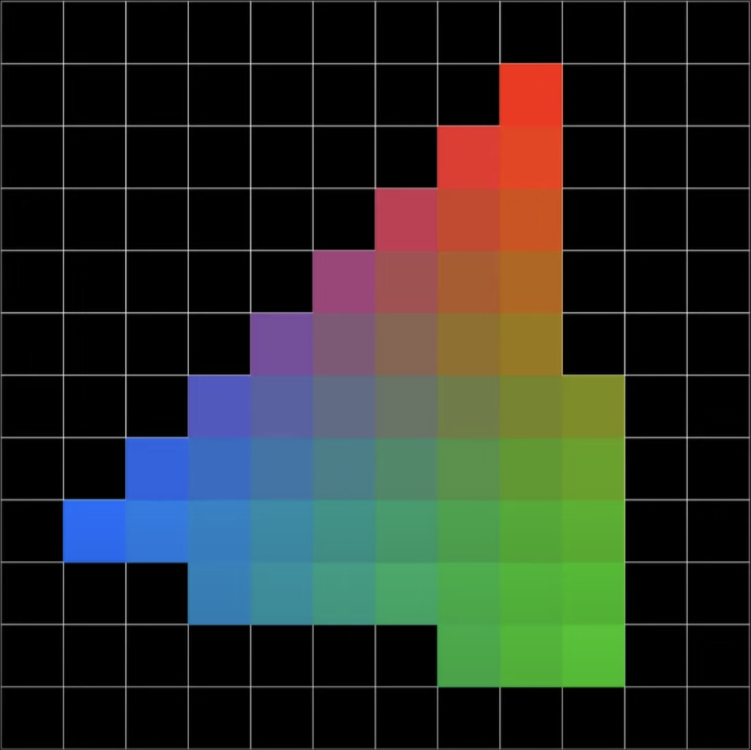
If you observe how polygons move around the screen, you'll notice that vertices jump around. You'll find many resources out there blaming this on precision errors due to the lack of a floating-point coprocessor on the PS1. While they are technically correct and the PS1 does not really have an FPU, the main reason polygons jitter is not because the console lacks floating-point representation, but because the rasterizer does not offer subpixel precision.
You see, the PlayStation rasterizer only works with integer coordinates and does not accept vertex values with subpixel precision. Vertex coordinates will therefore end up being rounded to the nearest integer value, which causes polygon vertices to snap to the pixel grid.
The image below shows a rasterizer without subpixel accuracy. Observe how the vertices snap to the grid and jump around the screen as the coordinates jitter to the closest integer values. This is similar to how the PlayStation rasterizer works.
On the other hand, consoles that offer subpixel precision allow a smoother movement, as vertices can assume values “in-between” pixel coordinates. The end result of the movement in this case is a lot less jumpy than the PS1 renderer.
Lack of FPU
Since we mentioned that the PlayStation does not have a FPU (Floating Point Unit), I think we can briefly discuss how PS1 games handle fractional numbers, like 10.56 or 3.14159. After all, games need to have a way of representing fractional quantities for things like acceleration, velocity, etc.
Floating-Point Representation
If you are a modern programmer, chances are the machine or the game console you're programming for has native hardware support for floating-point numbers. We are used to declaring variables as floats or doubles. This representation is based on a standard that uses a super smart formula that allows us to represent a large number of different values using only 32 bits (floats) or 64 bits (doubles).

The most common standard for floating point arithmetic is the IEEE745, established in 1985 by the IEEE:
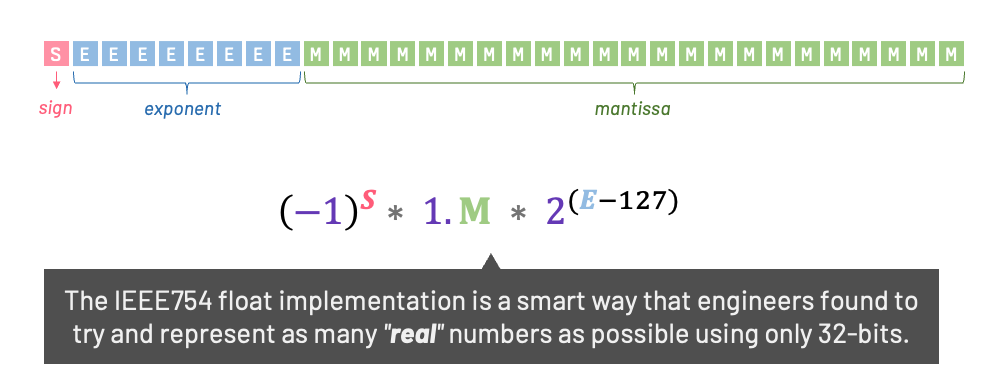
I want us to pause and really think about what is going on here. We have only 32 bits to represent the maximum number of “real numbers” that we can. that's actually quite a surreal statement! Using 32 bits, we can represent \(2^{32}\) different integer numbers, which is just a little bit more than 4 billion integers! Using the formula above we can represent not just a large range of integer numbers, but also their fractional part with good-enough precision.
Unfortunately, that is not what the PlayStation uses since Sony did not include an FPU coprocessor in their console. Therefore, we must find a different alternative to represent fractional numbers with the PS1.
Fun fact: Some PS1 compilers will let you declare variables as float and use float numbers. But the truth is that proper float numbers are not supported via hardware and all the compiler offers is a software emulation of float behavior. This is often a dealbreaker for us; the software implementation of floating-points used by the compiler is usually too slow for PS1 games.
Fixed-Point Representation
The alternative that is better suited for a system that does not have an FPU is to use an integer-based fractional number system commonly known as fixed-point.
Instead of a point floating around our number, we'll fix it! That means we will reserve a fixed number of bits fort the integer part and a fixed number of bits for the fractional part of the number.
And we can even choose the type of representation we need. Below you can see an example of a 16.16 and a 20.12 fixed-point representation.
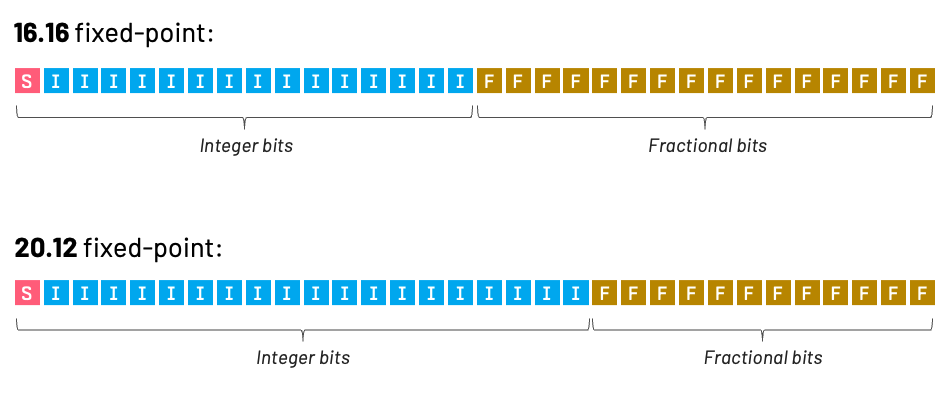
In both cases, we use a total of 32 bits to represent our number, but we alter the position where the fixed-point divisor is separating the integer & fractional part of our number. The decision is often based on the range of integers we need to represent in our game or how much precision we need for the fractional part of our number.
If our rasterizer allowed for sub-pixel movement, we would have pixels being subdivided into smaller parts based on the fractional part of our fixed-point representation, which means we can access smaller fractional parts of our whole pixel.
The following example shows two vertices in a raster grid with subpixel precision. Observe what happens as the left vertex moves inside the pixel and how the rasterized line adapts correctly to the movement depending on the different sub-pixel values.
Remember that this is not how the PS1 rasterizer works. The GPU only accepts integer (x,y) coordinates and vertices will snap to the integer grid causing polygons to jitter.
T-Junction Gaps & Near-Clipping
The natural evolution of our conversation about number representation and precision issues with fixed-point numbers is polygon gaps. In our case, the polygon gaps that we'll be discussing are produced by T-junctions in our meshes.
To fully understand what T-junctions are, let's take a look at the example that we use in our PlayStation programming course. In our lectures, we code together a very simple Wipeout-like toy project for the PS1 and one of the most important parts is the rendering of the track where the race takes place.
One of the first challenges we face as we try to render the track for the first time is a problem called near-clipping. This near-clipping happens when big polygons that are too close to the camera are discarded by the renderer. This culling of polygons results in big gaps as we navigate through the track.
This is a very common problem on the PS1, and to solve that we can either perform proper polygon clipping, where we use a clipping algorithm and end up with chopped up geometries clipped against the near-plane, or we can choose to simply subdivide these big polygons into smaller ones, which reduces the culling around the near-plane.
Sony tells developers (in their training docs) to give preference to the second option. Subdividing big polygons that are close to the near plane is faster and gives visual results that are good-enough. Therefore, we chose to subdivide the quads of the track into smaller ones based on how close they are to the camera.
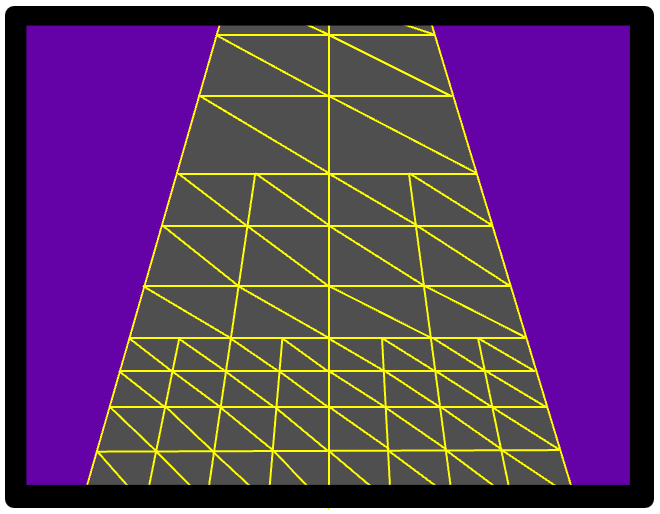
Do you see how we have a LOD (level-of-detail) system where we increase the number of subdivisions as polygons get closer the player? The example above shows three different LOD levels, where we subdivide the quads zero, one, or two times depending on their distance from the camera.
And we can see the T-junctions appearing already! Going from zero to one subdivision leaves us with a T-junction in our mesh. The same happens when we go from one subdivision to two. This naïve method of just subdividing the quads in half every time causes T-junctions to appear at every change of LOD level.
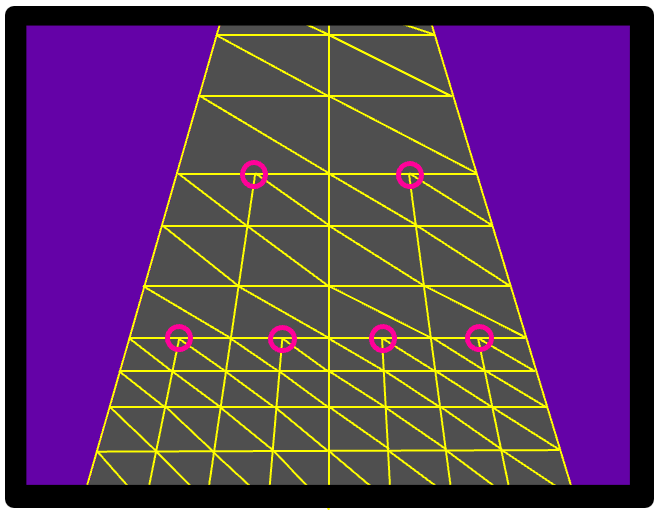
But why are T-junctions considered bad hombres in the first place? Well, the problem is that due to precision issues, that point that lies in between the original two might fall outside the line connecting the first two points.
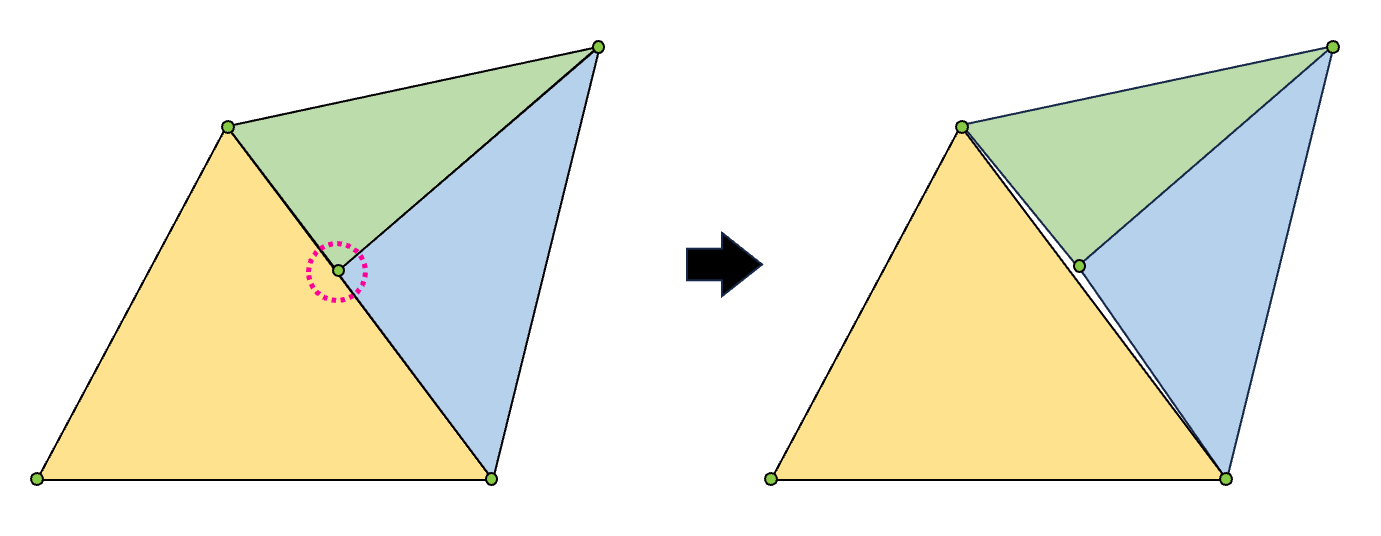
Do you understand now why T-junctions are problematic? The first two triangles shared vertices, therefore when the rasterization paints that line between them it will follow the same rasterization rule. But the problem appears as we have an extra point that might end up a little bit to the left or a little bit to the right of that line. The rasterization rule used to connect these points might be different than the one used previously, and we will potentially see a gap where this T-junction occurs.
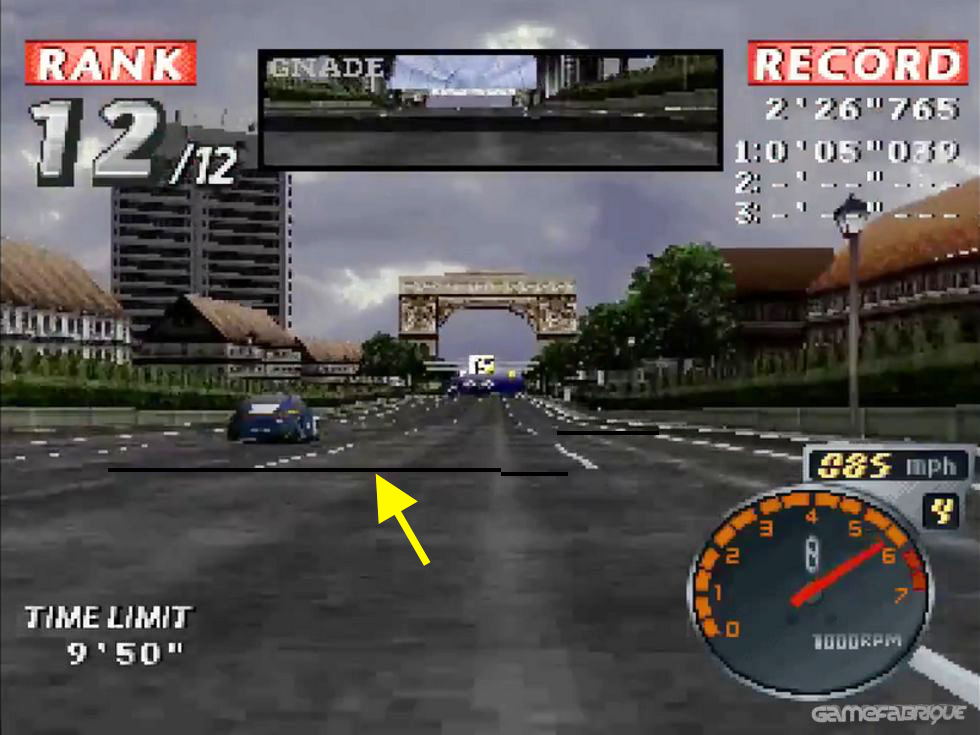
There are many games where these gaps are visible. Wipeout is one example but it's not the only one. We can also see T-junction sparks in Namco's Rage Racer every time we have gaps in our polygons.
Fun fact: Subdividing big polygons that are close to the viewer is also extremely useful when we want to reduce that affine texture distortion that was mentioned earlier. By subdividing and using smaller geometries the distortion become a lot less visible. This method of subdividing polygons to reduce the distortion of the textures is used by many PlayStation games.
Dithering
One super important visual detail that sometimes gets overlooked by other resources is dither. Sony's console implements a special dithering style that is a crucial part of the PS1 look.
Dithering is basically a technique to simulate extra colors by applying a combination pattern of two existing colors.

Even though the PlayStation was capable of using 24-bit colors (giving us a little bit over 16 million unique colors), it still displayed an abundance of dithering in almost every frame.
Keep in mind that the programmer did not need to implement a custom dithering algorithm, since the console has a specific hardware attribute to manage 24-bit or 15-bit dithering. In other words, this was a hardware feature that was embedded in the GPU of the PlayStation console and that was applied in all textured polygons.
Some gamers do not like the dithering effect on the PS1 and modders eventually found ways to remove it.
Lack of Mip-Mapping
Finally, I just want to mention that the PlayStation console does not natively support mip-mapping. In computer graphics, mipmaps are pre-calculated, optimized sequences of textures, each of which is a progressively lower resolution representation of the previous. One very common approach is to have different resolutions for different values of powers of 2.
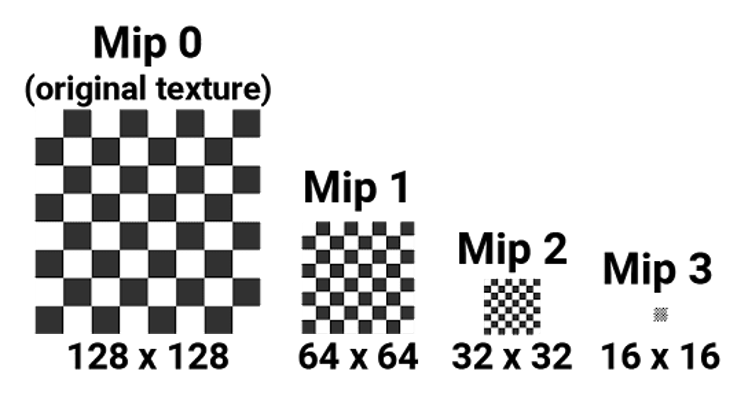
The original Wipeout game tries to accomplish this via code. It stores different resolutions of the same texture in the CD and decides which one to use based on how far the track quad is from the camera. This follows the same logic of track quad subdivision mentioned previously. Quads that are subdivided once use a mid-res texture and quads that are subdivided twice are mapped using a high-res version.
Conclusion & Extra Resources
Trying to squeeze everything about the PlayStation and its technical inner workings in a simple blog post is basically impossible. But hopefully this review was important for us to create an intuition of what is happening behind the scenes and why those PS1-style artefacts happen.
It goes without saying that this is just the tip of the iceberg when it comes to how the PlayStation works and all the beautiful details of how the Sony console is designed. If you really want to learn how to code PlayStation games, don't forget to check our PlayStation Programming lectures, where we spend more than 40 hours poking the PS1 and really understanding how to program games for it. It's super fun!
A great resource for beginners that is worth mentioning is the PSXDEV community. Also, the DisplacedGamers Youtube channel can be an entertaining way to start learning more about the PS1 and to understand how some of its games were programmed.
And I think that concludes our quick review. If you have any suggestions or comments about this blog post you can simply drop me a message and follow us on Twitter. I'll be really happy to hear from you.
See you soon!