

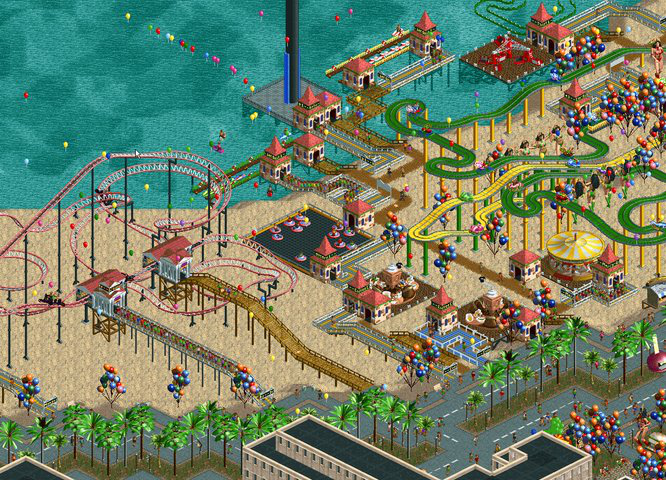
I was talking to one of my students during office hours last week, and we ended up touching the topic of isometric projection. Even though the discussion was about modern 3D computer graphics, most of the games that she mentioned were retro isometric games like Ultima VIII, SimCity 2000, and RollerCoaster Tycoon.
I believe most of my readers have a good gut-feeling of what isometric games are. Even if you never played an isometric game before, you'd probably recognize a game that uses an isometric viewpoint.
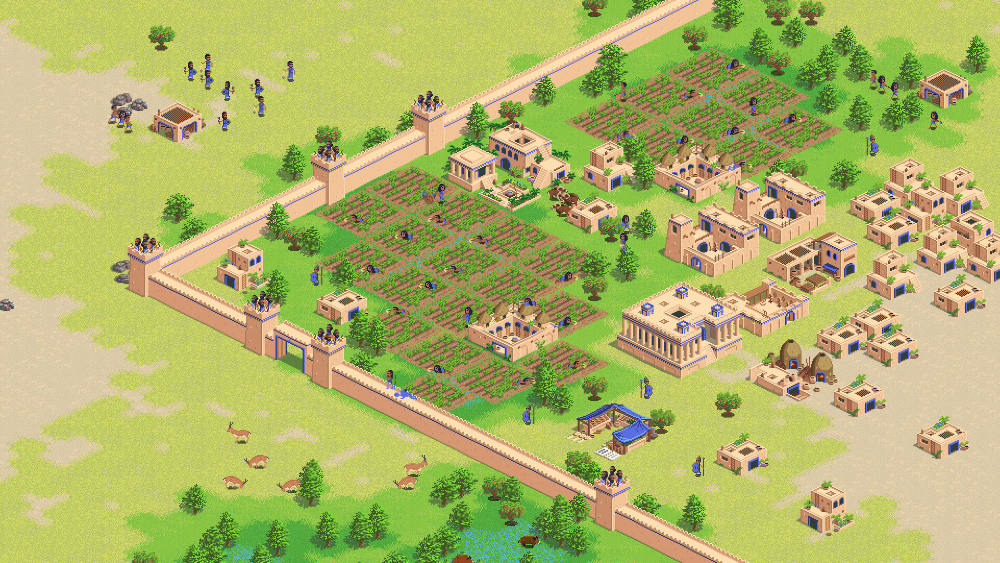
Since many of the titles we know and love carry this isometric "look", I've decided to write a short article explaining how isometric projection really works. Once we are done with the basics, we can even go ahead and try to code something simple together. And if you have seen my content before, you know that I'll definitely try to add some super cool retro nerd history along the way!
Alright! Let's dive in.
3D Projections
Let's start by understanding where this expression "isometric" comes from.
When we are programming 3D games, we have to choose how our game will display 3D objects in our 2D screen. This is what we call projection, and there are different types of projection that we can choose from.
Orthographic Projection
I have a feeling that the easiest type of projection for us to understand is called orthographic projection. When we choose to use orthographic projection, we simply ignore the z components of our original 3D points and project them without considering depth.
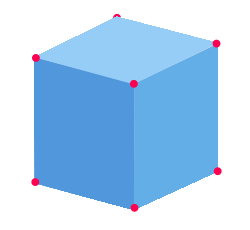
In the ortographic projection, it does not matter how far or close the object's vertices are in 3D, we'll project them directly onto the 2D screen ignoring their depth. And you might think that this image looks similar to what an isometric tile looks like, but we are still missing some important details for an orthographic projection to be also isometric. But we'll get there!
Perspective Projection
Another very popular type of projection is called perspective projection. Many 3D games use perspective projection because it's similar to how humans perceive the real world. In this type of projection, vertices that are close to us will be scaled to appear bigger and vertices that are far away will be scaled down to appear smaller.
Nit picking: To avoid any misunderstanding, when I say that vertices will be scaled up or down we are not talking about the size of the vertex points, but their components x and y. The size of a vertex point cannot be scaled, as they are simply points in space. But their position in the plane will be scaled up or down accordingly, and the polygon faces formed by the connection of those vertices will then appear to be bigger or smaller as they are closer or far away from the viewer.
To achieve the perspective effect, it is common for programmers to use something called "perspective divide", which is a fancy name for something super simple. In the context of perspective projection, the perspective divide simply means we must divide the original point's x and y by their z value.
The resulting projected x on the screen is equal to the original x value divided by the z value, and the final projected y is equal to the original y of the point divided by its z value.
Inversely proportional relationship: Look at the perspective divide formula above. Does it make sense to you intuitively? The fraction creates an inversely proportional relationship between the projected screen values of x and y with the point's depth.
- The bigger the z, the more we divide, and the smaller the resulting x,y is.
- The smaller the z, the less we divide, and the bigger the resulting x,y is.
Things that are far away appear smaller, and things that are close appear bigger!
Right! So, now that we know what projection means and we briefly mentioned the two most popular types of projections in games, let's talk about isometric projection.
Isometric Projection
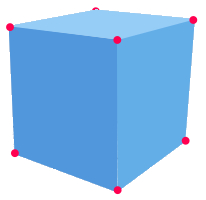
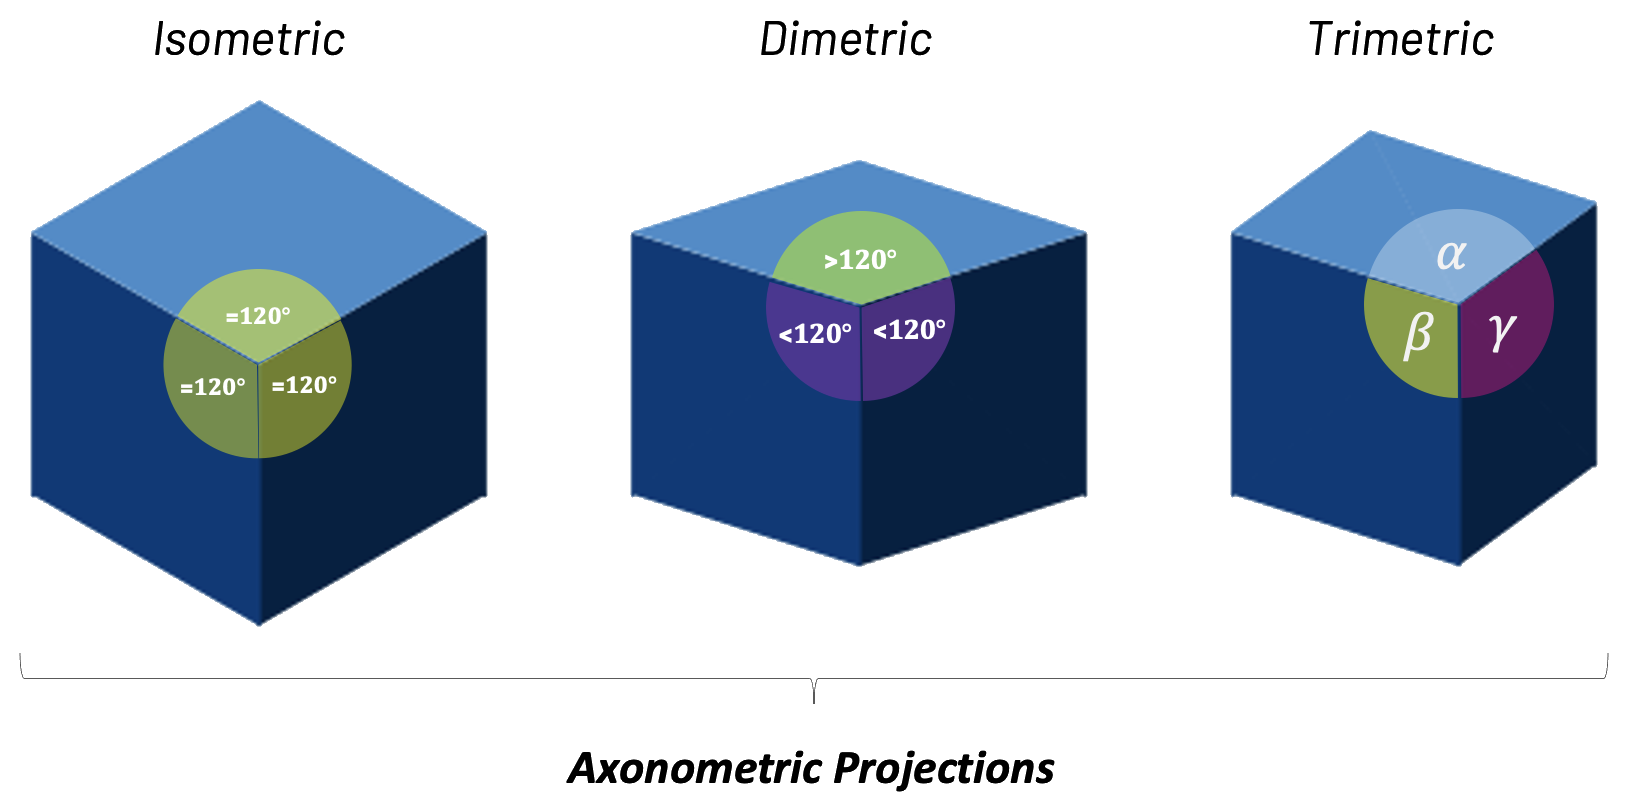
All this discussion about different projections is interesting, but what we really want is to discuss isometric projection. Isometric projection is, again, a method for visualizing 3D objects in two dimensions, but when we use proper isometric projection we make the angles between the x-axis, y-axis, and z-axis equal 120 degrees.
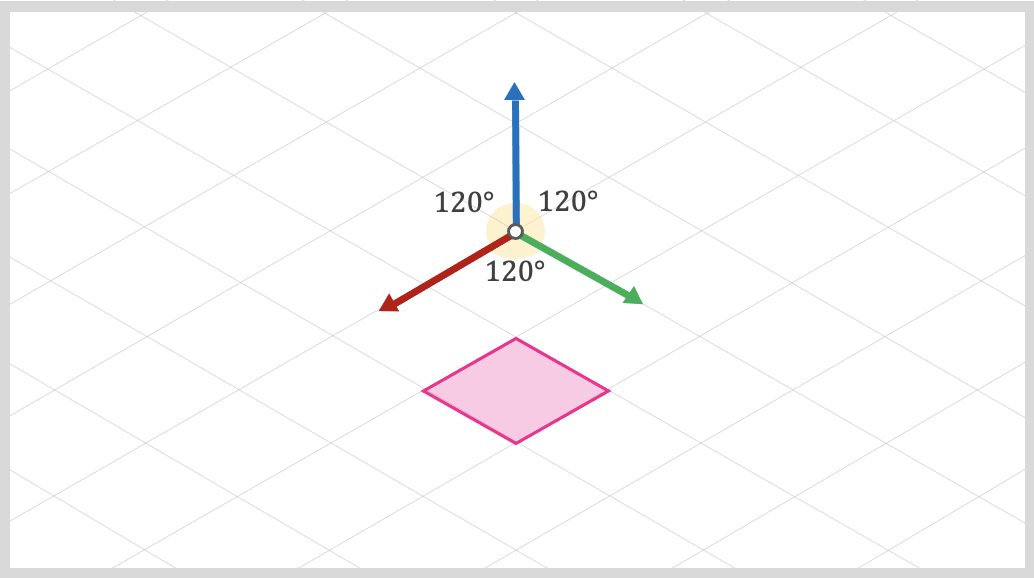
This angle equality is the main reason for the name: iso (equal) metric (measurement).
As you probably noticed, isometric projection is just a special configuration of the orthographic projection (the one where depth is ignored). This style became super popular in video games, allowing pixel artists to create elaborate environments by placing simple isometric tiles in the scene.
Observe how we can have x and y running along the "floor" of our grid, while z usually points up.

A Bunch of Lies
I want to take a moment to mention something super important before we continue. Since are speaking about different 3D projections, most students naturally think of games with 3D polygons and 3D meshes. In reality, most of the retro isometric games that we played were not really "true" 3D games.
Pixel artists would usually create a bunch of 2D tiles that look 3D, but contain no polygons or triangles. Our tiles are just a collection of 2D textures positioned in a way to make our game look 3D, but there is no real-time polygons being processed and no 3D projection math needs to be done via code.
This simplification was super important in a time where most machines did not have the horsepower to process real-time 3D polygons and perform fast 3D math. And this was also true for non-isometric games as well. For example, the game Donkey Kong Country might have a 3D "feel" to it, but the developers simply pre-rendered the 3D models and baked them into a 2D sprite.
In the case of Donkey Kong Country, the artist used a Silicon Graphics station to create the 3D models, but what we see is only a pre-rendered baked 2D image of that 3D model.
And the lies don't stop here. What if I tell you that most games that we call isometric are not "true" isometric either!? These games are programmed using an angle between the axes that does not equal 120 degrees. Instead, they use 116.57 and 126.87 degrees.
This might seem funny at first, but this weird angle configuration gives us tiles with a perfect 2:1 pixel ratio. This makes some trig calculations easier, and also makes things easier for the artist drawing the tiles. All we have to do is ask the artist to create 2:1 tiles. Depending on the game, the tiles can be 100x50, 600x300, 64x32, etc.
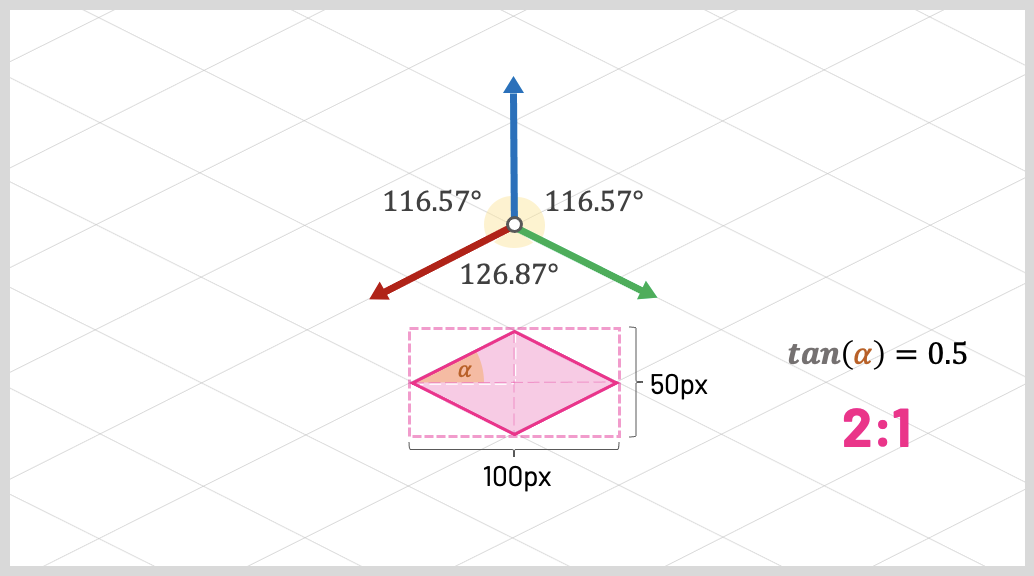
Look at that! Just a small adjustment in our angles was enough for us to guarantee that our tiles are always 2:1.
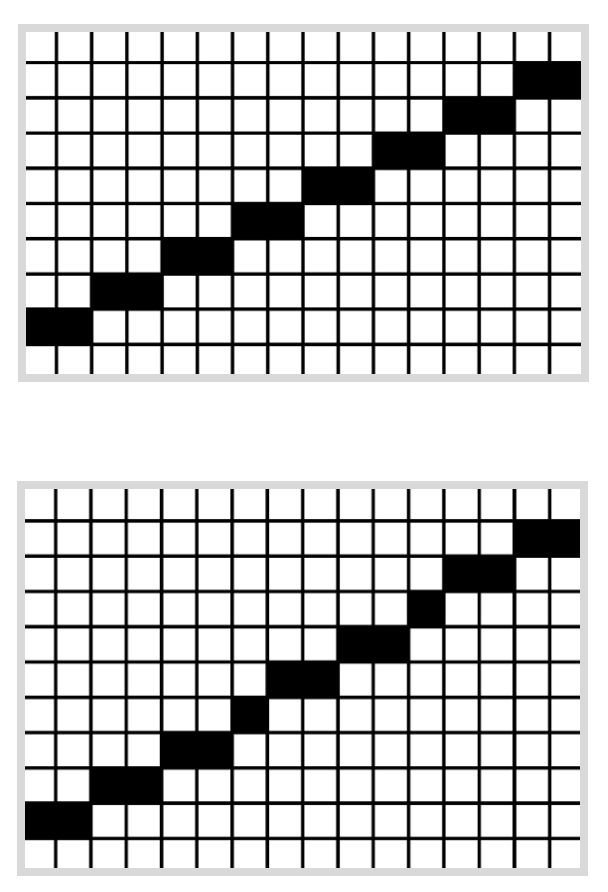
These "pseudo" isometric angles also makes things easier on the machine; especially older ones. A 2:1 ratio can help us render pixelated lines more precisely. Using this angle configuration, for every two pixels we move horizontally, we move exactly one pixel vertically. On the other hand, if we are using "true" isometric angles, for every two pixels we moved horizontally, we need to move 1.732 pixels vertically. Yikes.
All these details might seem a bit pointless to modern developers, given that now we have powerful anti-aliasing algorithms and processors that can perform extremely fast math. But if you ever developed games for older CPUs, you know that integers are always preferred over floating-point numbers.
Speaking of older machines, if we choose a 2:1 pixel ratio, many of the computations could be achieved by simply multiplying or dividing things by 2. And if you ever saw my lectures on Bit-shifting Operators, you know that older CPUs can achieve super fast multiplication and division by 2 using a single CPU instruction shifting bits right or left.
There we go! Just by tilting our angles by a small amount, we end up with a nice 2:1 tile ratio, and that simplifies things a lot. Back then, it was all about finding simplifications to reduce the number of clock cycles per game frame.
Fun fact: This projection that has a tile ratio of 2:1 and has two angles equal and one different is called dimetric. Following the same logic, a projection that has three different angles is called trimetric. All these projections fall under the unbrella of a group called axonometric projections.
I'll bet you will never need to use the terms dimetric or trimetric as a game programmer. That being said, I used to code CAD systems for architects and engineers, and these projection names appeared a lot during our meetings.
"But Gustavo... does that mean all isometric games I ever played were just 2D textures positioned in a way that made them look 3D?"
No! Absolutely not. We can find modern "isometric" games that are true 3D games. They have real 3D polygons and real 3D animations. It just happens that the developers chose to position the camera in a way that gives them an isometric look.
If you are a beginner developer and you're using a game engine like Unity or Unreal, you can achieve this effect by simply choosing an orthographic view and placing your camera in the exact position that makes your game look isometric. It might seem too easy, but many isometric games do just that.
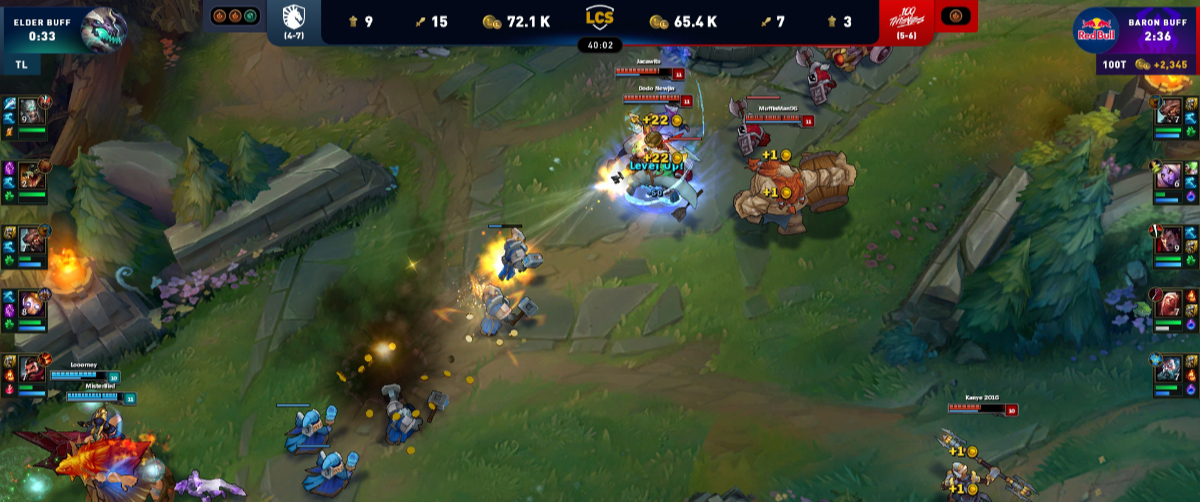
Some examples of 3D games that use an isometric viewpoint are League of Legends, Diablo II: Resurrected, The Ascent, Echochrome, and Monument Valley. Echrochrome and Monument Valley are worth mentioning because they explore the "lack of depth" of the orthographic projection to create some interesting puzzles.
Coding an Isometric Grid of Tiles
I think we covered some interesting ideas behind isometric-looking games. Let's see if we can code a very simple isometric map of tiles.
I'll use JavaScript and the P5js graphics library for this example, but everyting we'll learn should be agnostic to the technology you choose. You can use any other programming language or graphics framework to achieve similar results.
Coding along: If you want to follow along, a great option is the P5js Web Editor. This is an online coding environment that comes with P5js already configured. You can find a ZIP file with the initial code and images of our P5js project here.
To start, let's define that the tiles in our isometric grid are 100 pixels by 50 pixels.
const TILE_WIDTH = 100;
const TILE_HEIGHT = 50;
The next step is to load an array with our tile images. I'll use a special P5js function to read three PNG files.
If you're using something other than JavaScript, here is where you'll need to use a graphics framework to load and render PNG files. Some examples are SDL for C, SFML for C++, and PyGame for Python.
It's incredibly easy to load PNG files with P5js:
let tile_images = [];

function setup() {
  createCanvas(windowWidth, windowHeight);
  tile_images.push(loadImage("./tiles/grass.png"));
  tile_images.push(loadImage("./tiles/sand.png"));
  tile_images.push(loadImage("./tiles/water.png"));
}
The setup() function is the first thing to be executed by our P5js code. So, before we do anything, we create a blank canvas that fills the entire browser window and proceed to load three PNG files into an array of image objects to be used later.
Now that we have the array of tile images, let's start thinking about how we can draw our first tile on the screen.
Let's create a draw() function. This is a special P5js function that is executed several times per second and it's used to draw objects on the screen. For now, let's simply invoke the function image() from P5js to draw the first tile image that we have inside our array.
function draw() {
  background("black");
  image(tile_images[0], width/2, 50);
}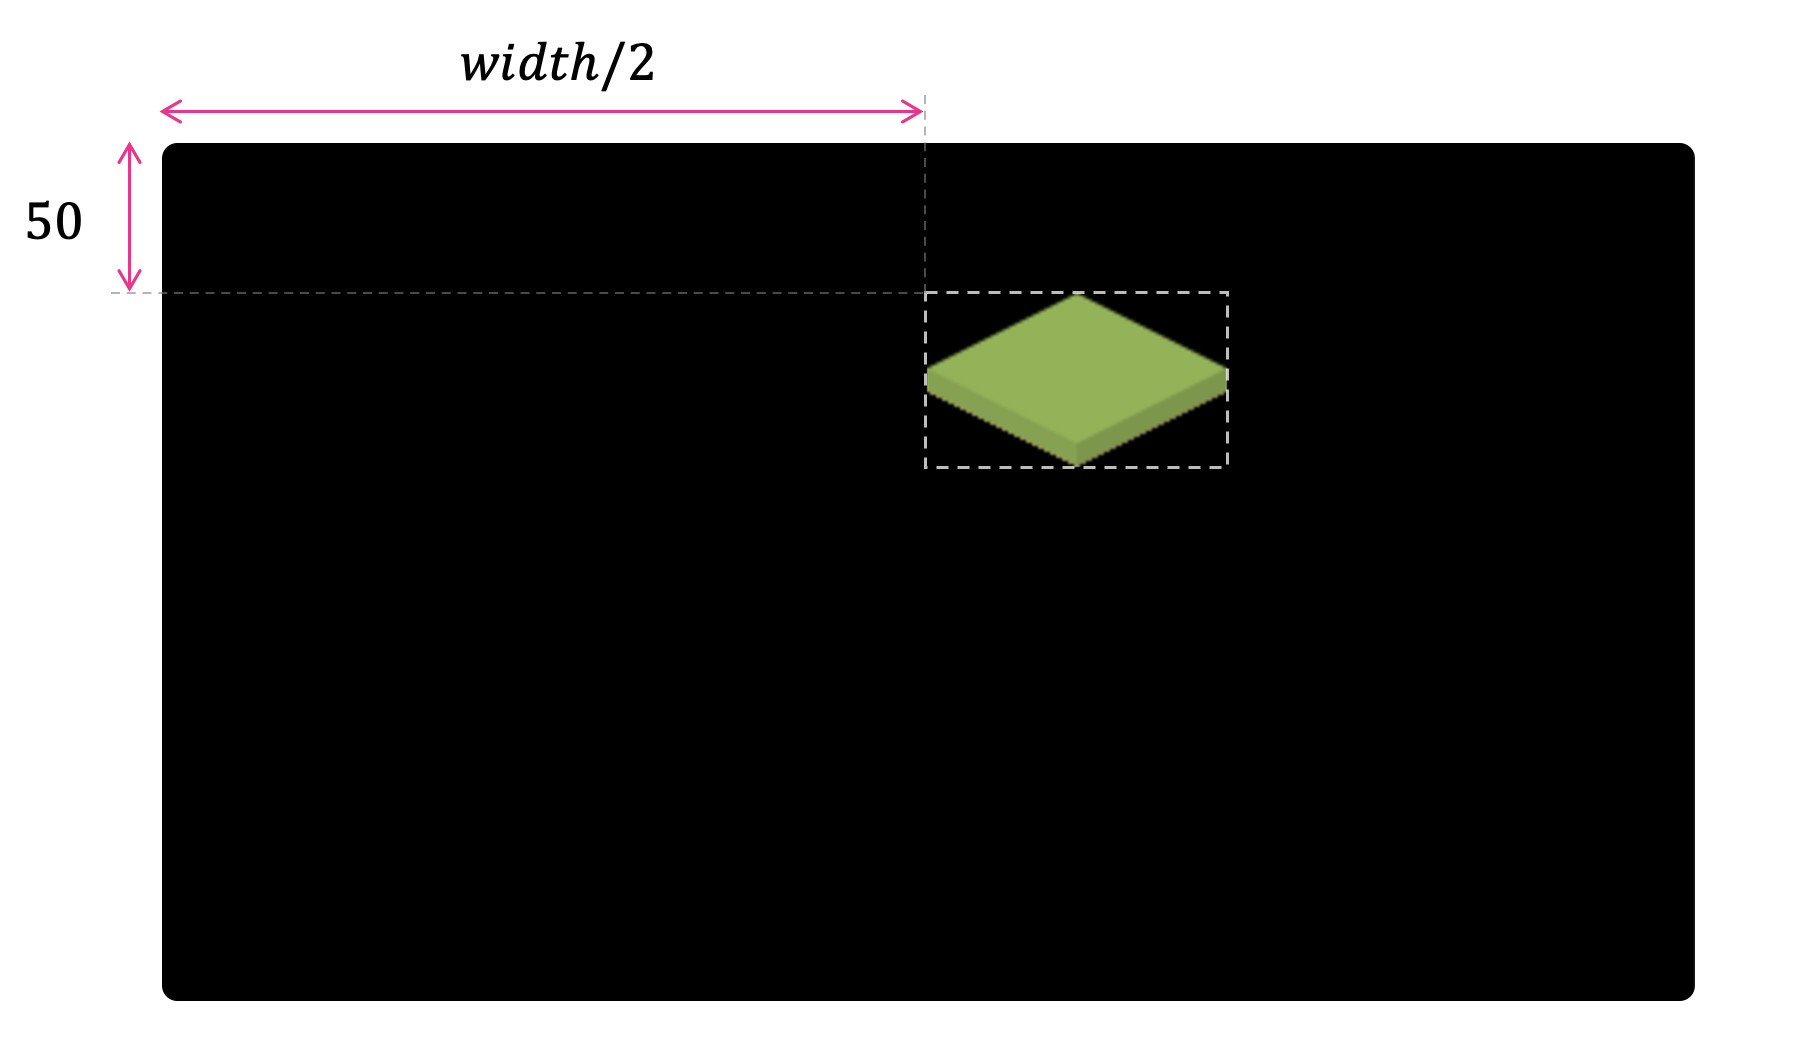
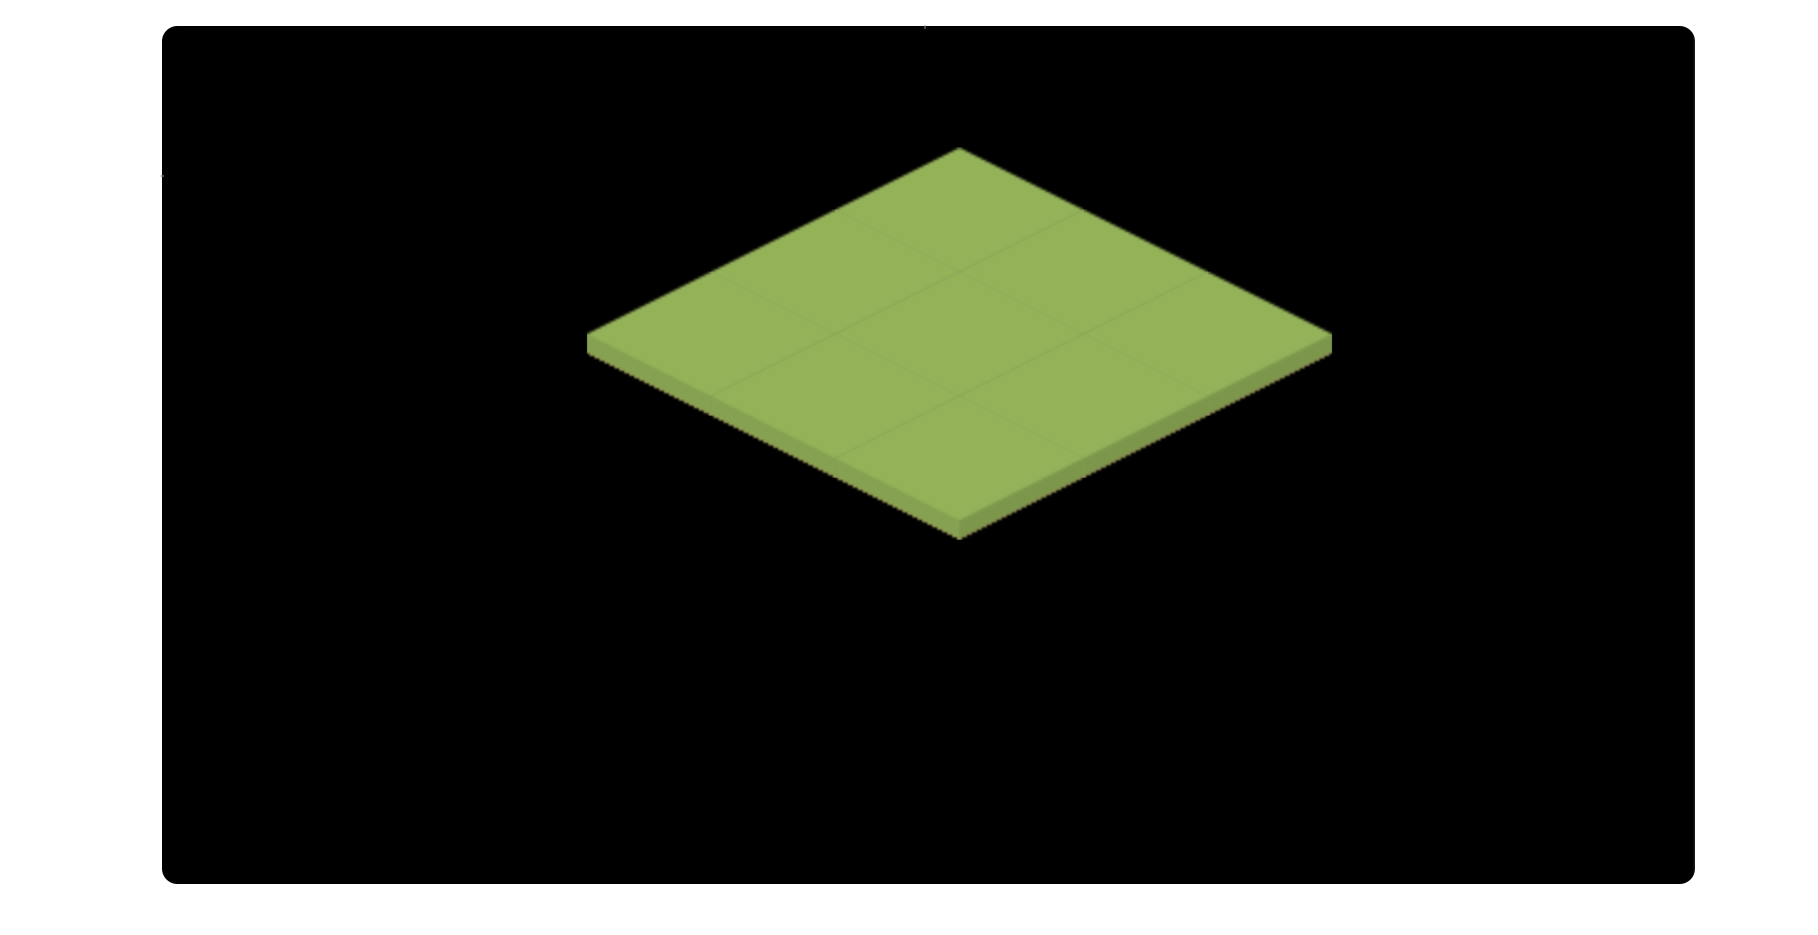
We can see that we have our first "grass" tile being displayed somewhat in the middle of the canvas. We used a special variable from P5js called width that has the width of the HTML canvas we are working with.
But that's not really the middle, is it? In our code, we told the function image() to display our tile image at position width/2 pixels to the right and 50 pixels down. We'll probably need to account for the tile size and offset our x position to the left.
Let's subtract half of our tile width from the x position. We should now have a tile that is perfectly centered in the middle of our canvas width.
image(tile_images[0], width/2 - TILE_WIDTH/2, 50);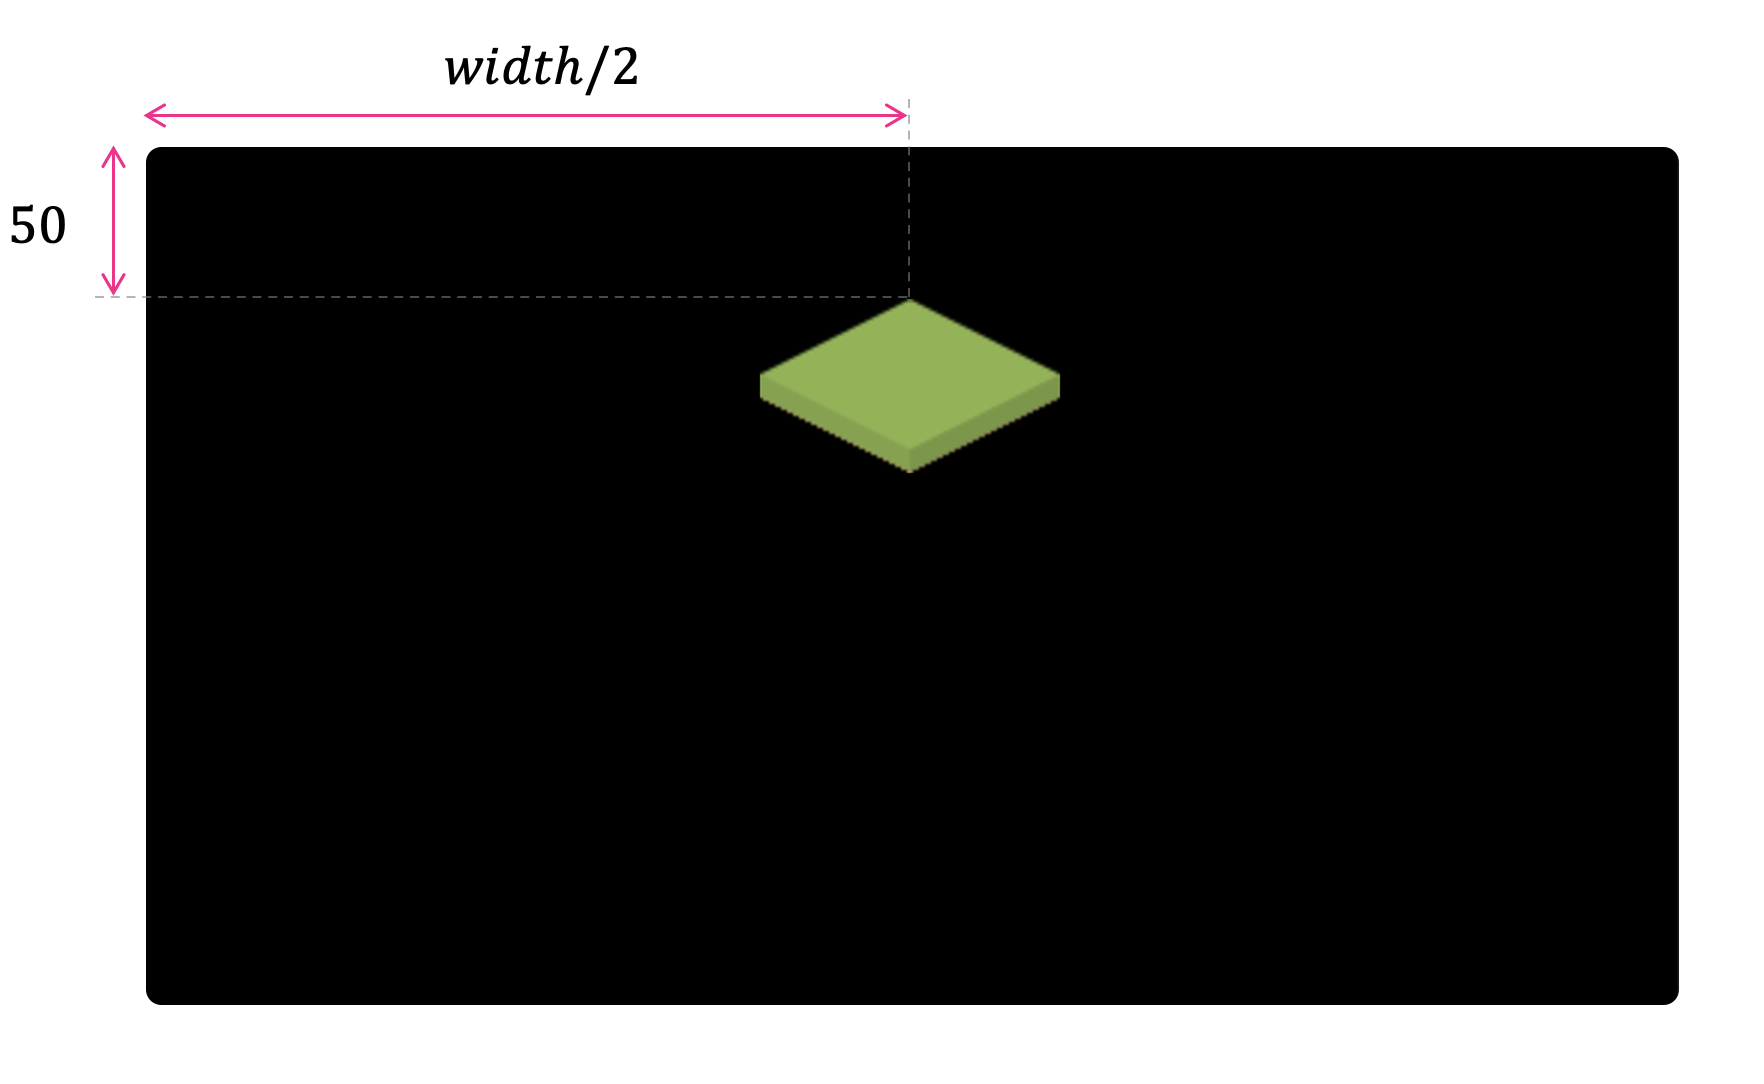
That's more like it!
Great. So, now we have found a way of calculating the start position of our first top tile. This is super important because the position of every other tile in our grid will be based on this start x and y position. All we need now is to come up with a formula to find how much we need to offset horizontally and vertically to draw each one of the other tiles.
Isometric Grid-Cell Units
Now that we have a small project that knows how to load and display images on the screen, let's think about the math we need to correctly position our isometric tiles.
First, we need to define how we keep track of tile numbers. One common approach is to define tiles by grid units. This means we won't speak of tiles in pixels anymore, like 400 pixels or 160 pixels. Instead, we'll speak of tiles as positions on "grid cells."
Most isometric games use x and y as cell-units running along the grid "floor." In our implementation, we'll start at the top and increase x as we move to the right and increase y as we move down.

Our goal here is to create a function called draw_tile() that receives the cell number x and the cell number y we want to render a tile. For example, the tiles above are rendered using the following x and y indices:
draw_tile(4, 1);
draw_tile(5, 1);
Let's go ahead and refactor our code to add a draw_tile() function that receives the image we want to render and the grid-cell values of x and y.
function draw_tile(img, x, y) {
  let x_screen = /* todo: calculate x value in pixels */
  let y_screen = /* todo: calculate y value in pixels */
  image(img, x_screen, y_screen);
}

function draw() {
  background("black");
  draw_tile(tile_images[0], 0, 0);
  draw_tile(tile_images[0], 1, 0);
  draw_tile(tile_images[0], 2, 0);
}
Calculating Tile Screen Coordinates
Let's go ahead and find a formula to compute the correct x_screen and y_screen values based on the grid-cell values x and y that we received via parameter.
Let's assume we want to find the screen pixel value where we should draw the tile (2,0).
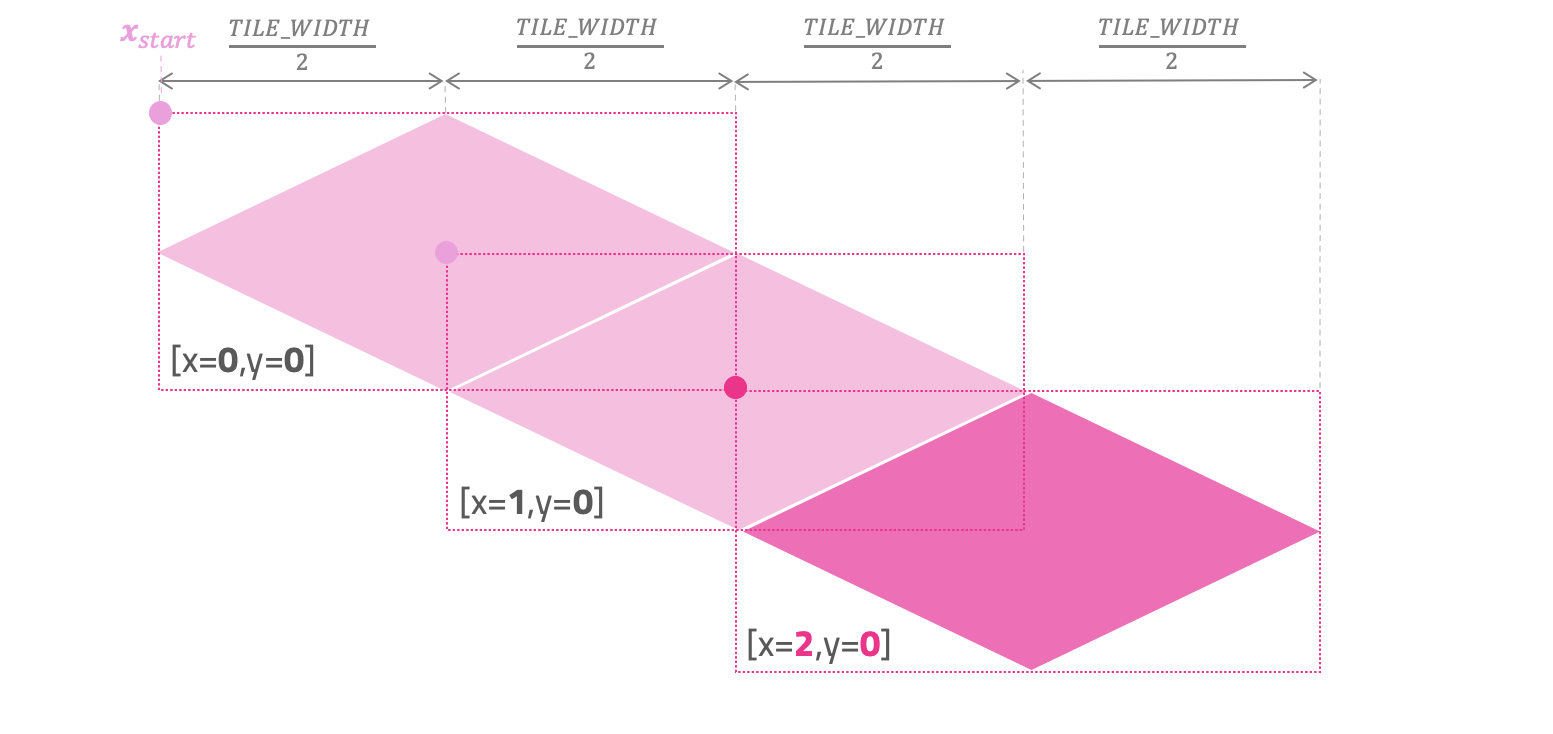
As the values of x in the grid grow (1, 2, 3, etc.), we need to offset the x_screen to the right. Do you agree?
But how much to the right? If we look at the illustration above, we can see that for every tile unit we need to move TILE_WIDTH/2 times to the right.
So, the formula that tells us the position x_screen in pixels as the value of x increases is:
Math notation: I want you to pause for a second and really look at the formula above. Make sure you understand where the variables are coming from and how the values change depending on the grid-cell x value that we pass as parameter. I want my students to feel comfortable reading this type of math notation. Many great books and articles use this notation, and we'll see other formulas like this one very soon.
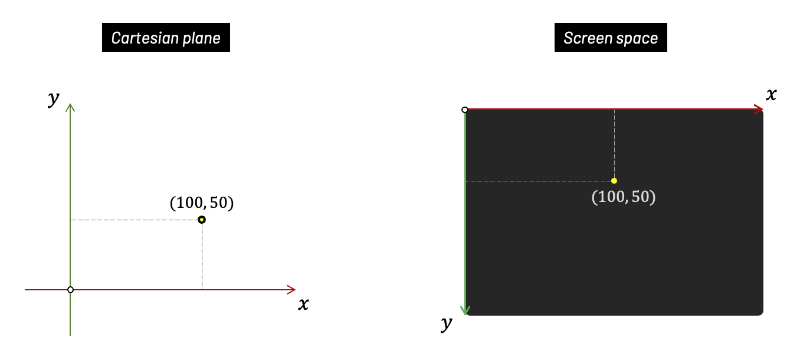
Flipped axis: Another important detail you'll need to get used to is the ocasional inconsistency of what "up" means in some formulas. In the traditional Cartesian plane the y component grows up, but in screen space y grows positive down. We could have kept the same orientation for everything, but as you evolve as a graphics programmer you'll need to learn to adjust the formulas of the resources you use, as they will always throw you a curve ball with these inconsistencies of orientation.
Let's go ahead and also think about what happens to the value of y_screen as the cell values of x grow in the grid.

As the values of x grow in the grid (1, 2, 3, etc.), we need to move y_screen down. But in this case, we need to move down by TILE_HEIGHT/2 pixels each time.
So, the formula that tells us the position y_screen in pixels as x grows is:
Let's put everything together and translate what we have so far into code.
let x_start = width/2 - TILE_WIDTH/2;
let y_start = 50;

function draw_tile(img, x, y) {
  let x_screen = x_start + x * TILE_WIDTH/2;
  let y_screen = y_start + x * TILE_HEIGHT/2;
  image(img, x_screen, y_screen);
}

function draw() {
  background("black");
  draw_tile(tile_images[0], 0, 0);
  draw_tile(tile_images[0], 1, 0);
  draw_tile(tile_images[0], 2, 0);
}
Beautiful! That looks good. As our x values grow in the grid, we are correctly converting our tiles from isometric grid coordinates to screen coordinates.
But we are still not done! We still need to account for the values of y in the grid. So, let's look at the illustration and try to find out what happens to x_screen and y_screen as the grid-cell value of y grows.
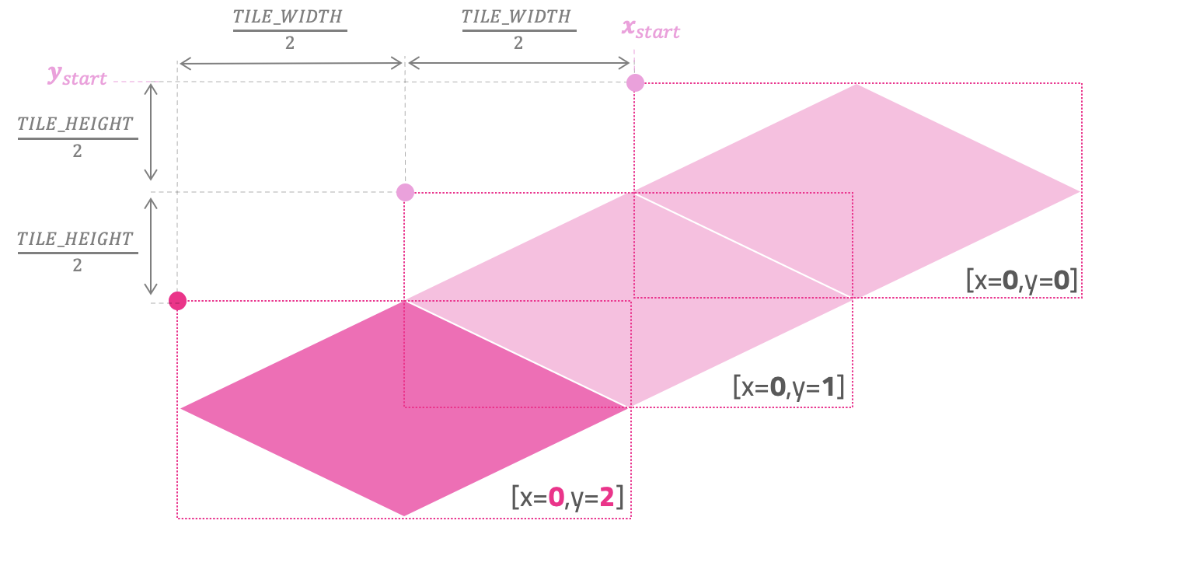
As we can see from the image above, when y cell values grow in the grid (1, 2, 3, etc.), we need to move left horizontally and down vertically on the screen. Once again, the offset is done by TILE_WIDTH/2 and TILE_HEIGHT/2 each time.
So, let's think about this. If growing the values of y makes us move left in x_screen, we probably need to subtract it from what we had before.
And, if growing the values of y makes us move down in y_screen, let's go ahead and add it to what we had in the previous formula.
And that's it! These are the formulas to find the x_screen and y_screen position based on the isometric grid x and y cell values.
Hopefully, you also agree that we can rewrite these formulas to group x and y together:
Let's translate this to code and see if our mapping works.
function draw_tile(img, x, y) {
  let x_screen = x_start + (x - y) * TILE_WIDTH/2;
  let y_screen = y_start + (x + y) * TILE_HEIGHT/2;
  image(img, x_screen, y_screen);
}

function draw() {
  background("black");
  draw_tile(tile_images[0], 0, 0);
  draw_tile(tile_images[0], 1, 0);
  draw_tile(tile_images[0], 2, 0);
  draw_tile(tile_images[0], 0, 1);
  draw_tile(tile_images[0], 1, 1);
  draw_tile(tile_images[0], 2, 1);
  draw_tile(tile_images[0], 0, 2);
  draw_tile(tile_images[0], 1, 2);
  draw_tile(tile_images[0], 2, 2);
}
Fingers crossed...
Look at that! A beautiful isometric grid of tiles being correctly mapped from grid-cell coordinates into screen-pixel coordinates.
Array of Tiles
I think the hard part is done. Let's just go ahead and use a 10x10 array to store the tiles of our isometric grid in memory. I'll also go ahead and create a new function that loops and renders all the grid tiles.
const GRID_SIZE = 10;
let grid = [
[2, 2, 2, 2, 2, 2, 2, 2, 2, 2],
[2, 0, 0, 0, 0, 0, 0, 0, 0, 2],
[2, 0, 0, 0, 0, 0, 0, 0, 0, 2],
[2, 0, 0, 0, 0, 0, 0, 0, 0, 2],
[2, 0, 0, 1, 0, 0, 0, 0, 0, 2],
[2, 0, 0, 1, 0, 0, 0, 0, 0, 2],
[2, 0, 0, 0, 0, 0, 0, 0, 0, 2],
[2, 0, 0, 0, 0, 0, 0, 1, 0, 2],
[2, 0, 0, 0, 0, 0, 0, 0, 0, 2],
[2, 2, 2, 2, 2, 2, 2, 2, 2, 2]
];
function setup() {
createCanvas(windowWidth, windowHeight);
tile_images.push(loadImage("./tiles/grass.png"));
tile_images.push(loadImage("./tiles/sand.png"));
tile_images.push(loadImage("./tiles/water.png"));
}
function draw_tile(img, x, y) {
let x_screen = x_start + (x - y) * TILE_WIDTH/2;
let y_screen = y_start + (x + y) * TILE_HEIGHT/2;
image(img, x_screen, y_screen);
}
function draw_grid() {
x_start = width/2 - TILE_WIDTH/2;
y_start = 50;
for (let i = 0; i < GRID_SIZE; i++) {
for (let j = 0; j < GRID_SIZE; j++) {
draw_tile(tile_images[grid[j][i]], i, j);
}
}
}
function draw() {
background("black");
draw_grid();
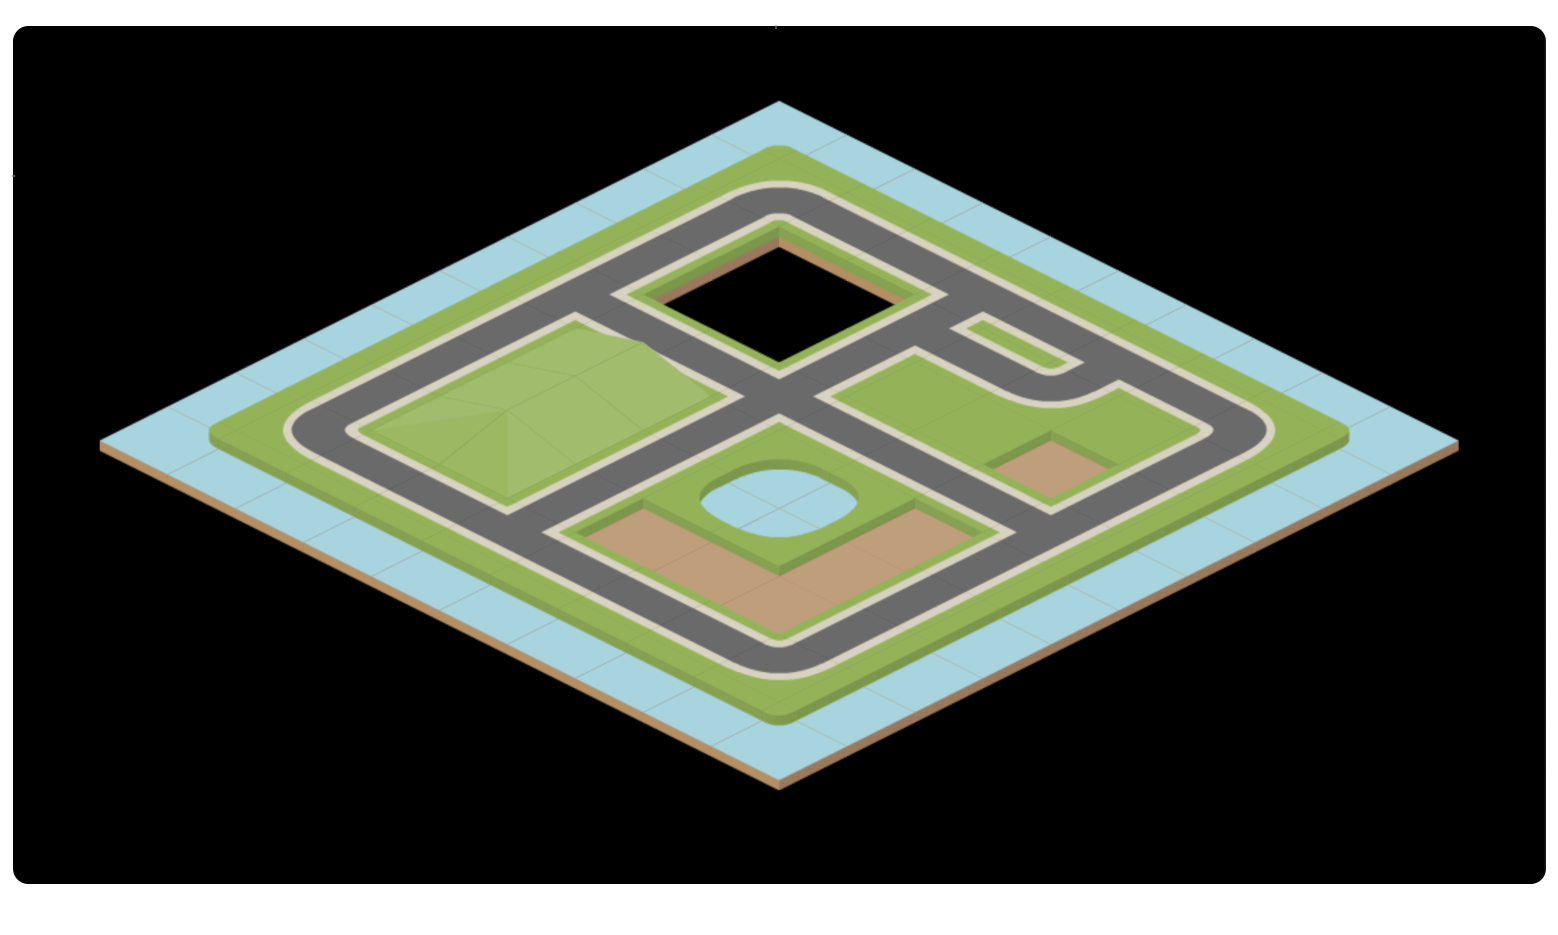
}As you can see, the function draw_grid() defines the start position of the first top tile, and proceeds to loop all cells of our grid array.
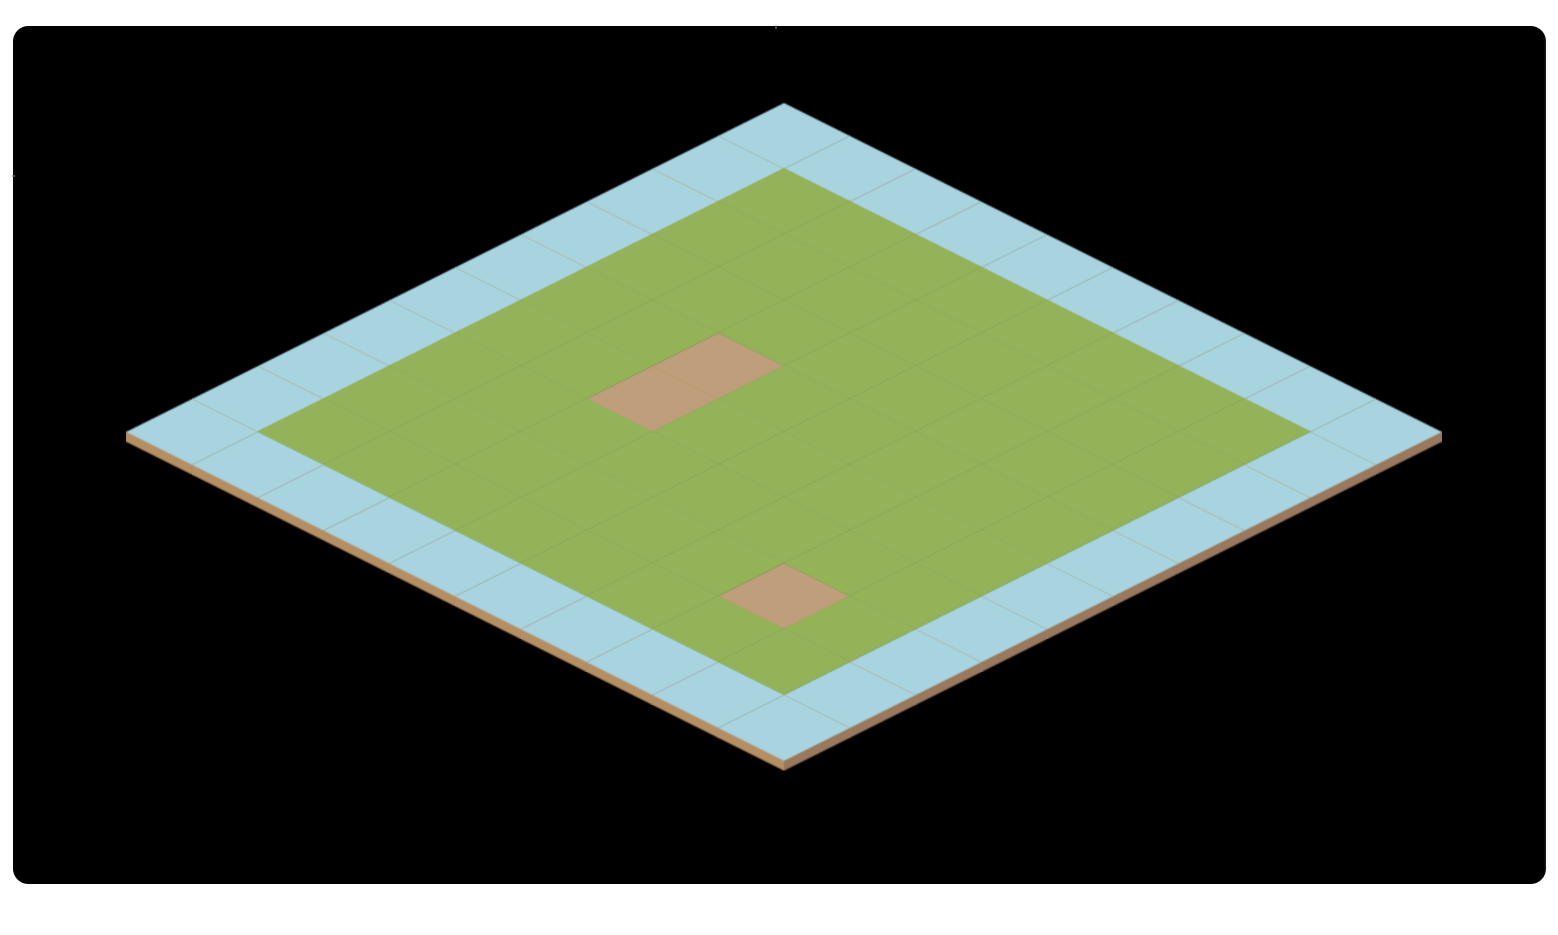
Perfect!
"Okay, but what about the order of the tiles? Do we need to do anything to prevent tiles from being rendered in front of others?"
That's a great question! The reason all our tiles are being displayed correctly is because of how we are looping our array. We draw all the tiles of the first row, then second row, then third row, etc. The two nested for-loops we're using guarantee that all tiles will be rendered "from back to front."
/* Loop all tiles (from back to front) */
for (let i = 0; i < GRID_SIZE; i++) {
  for (let j = 0; j < GRID_SIZE; j++) {
    draw_tile(tile_images[grid[j][i]], i, j);
  }
}
This was no accident. Most isometric games do just that!

Exploring the Z-Axis
The last thing I want to address is that isometric games can also explore the z-axis (up) to achieve interesting effects.
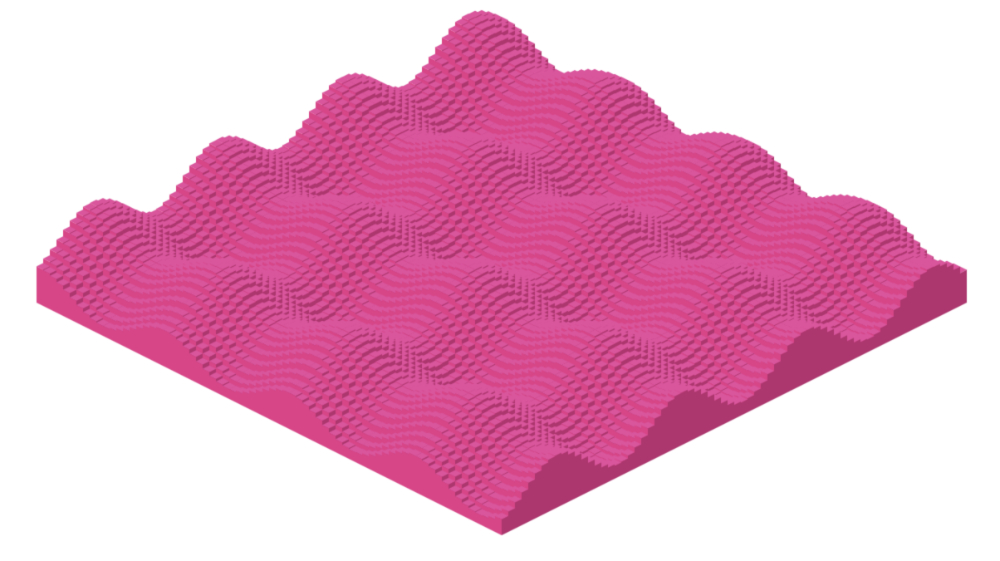
One of the great things we can do with this vertical offset is that we can now address tiles of different heights.
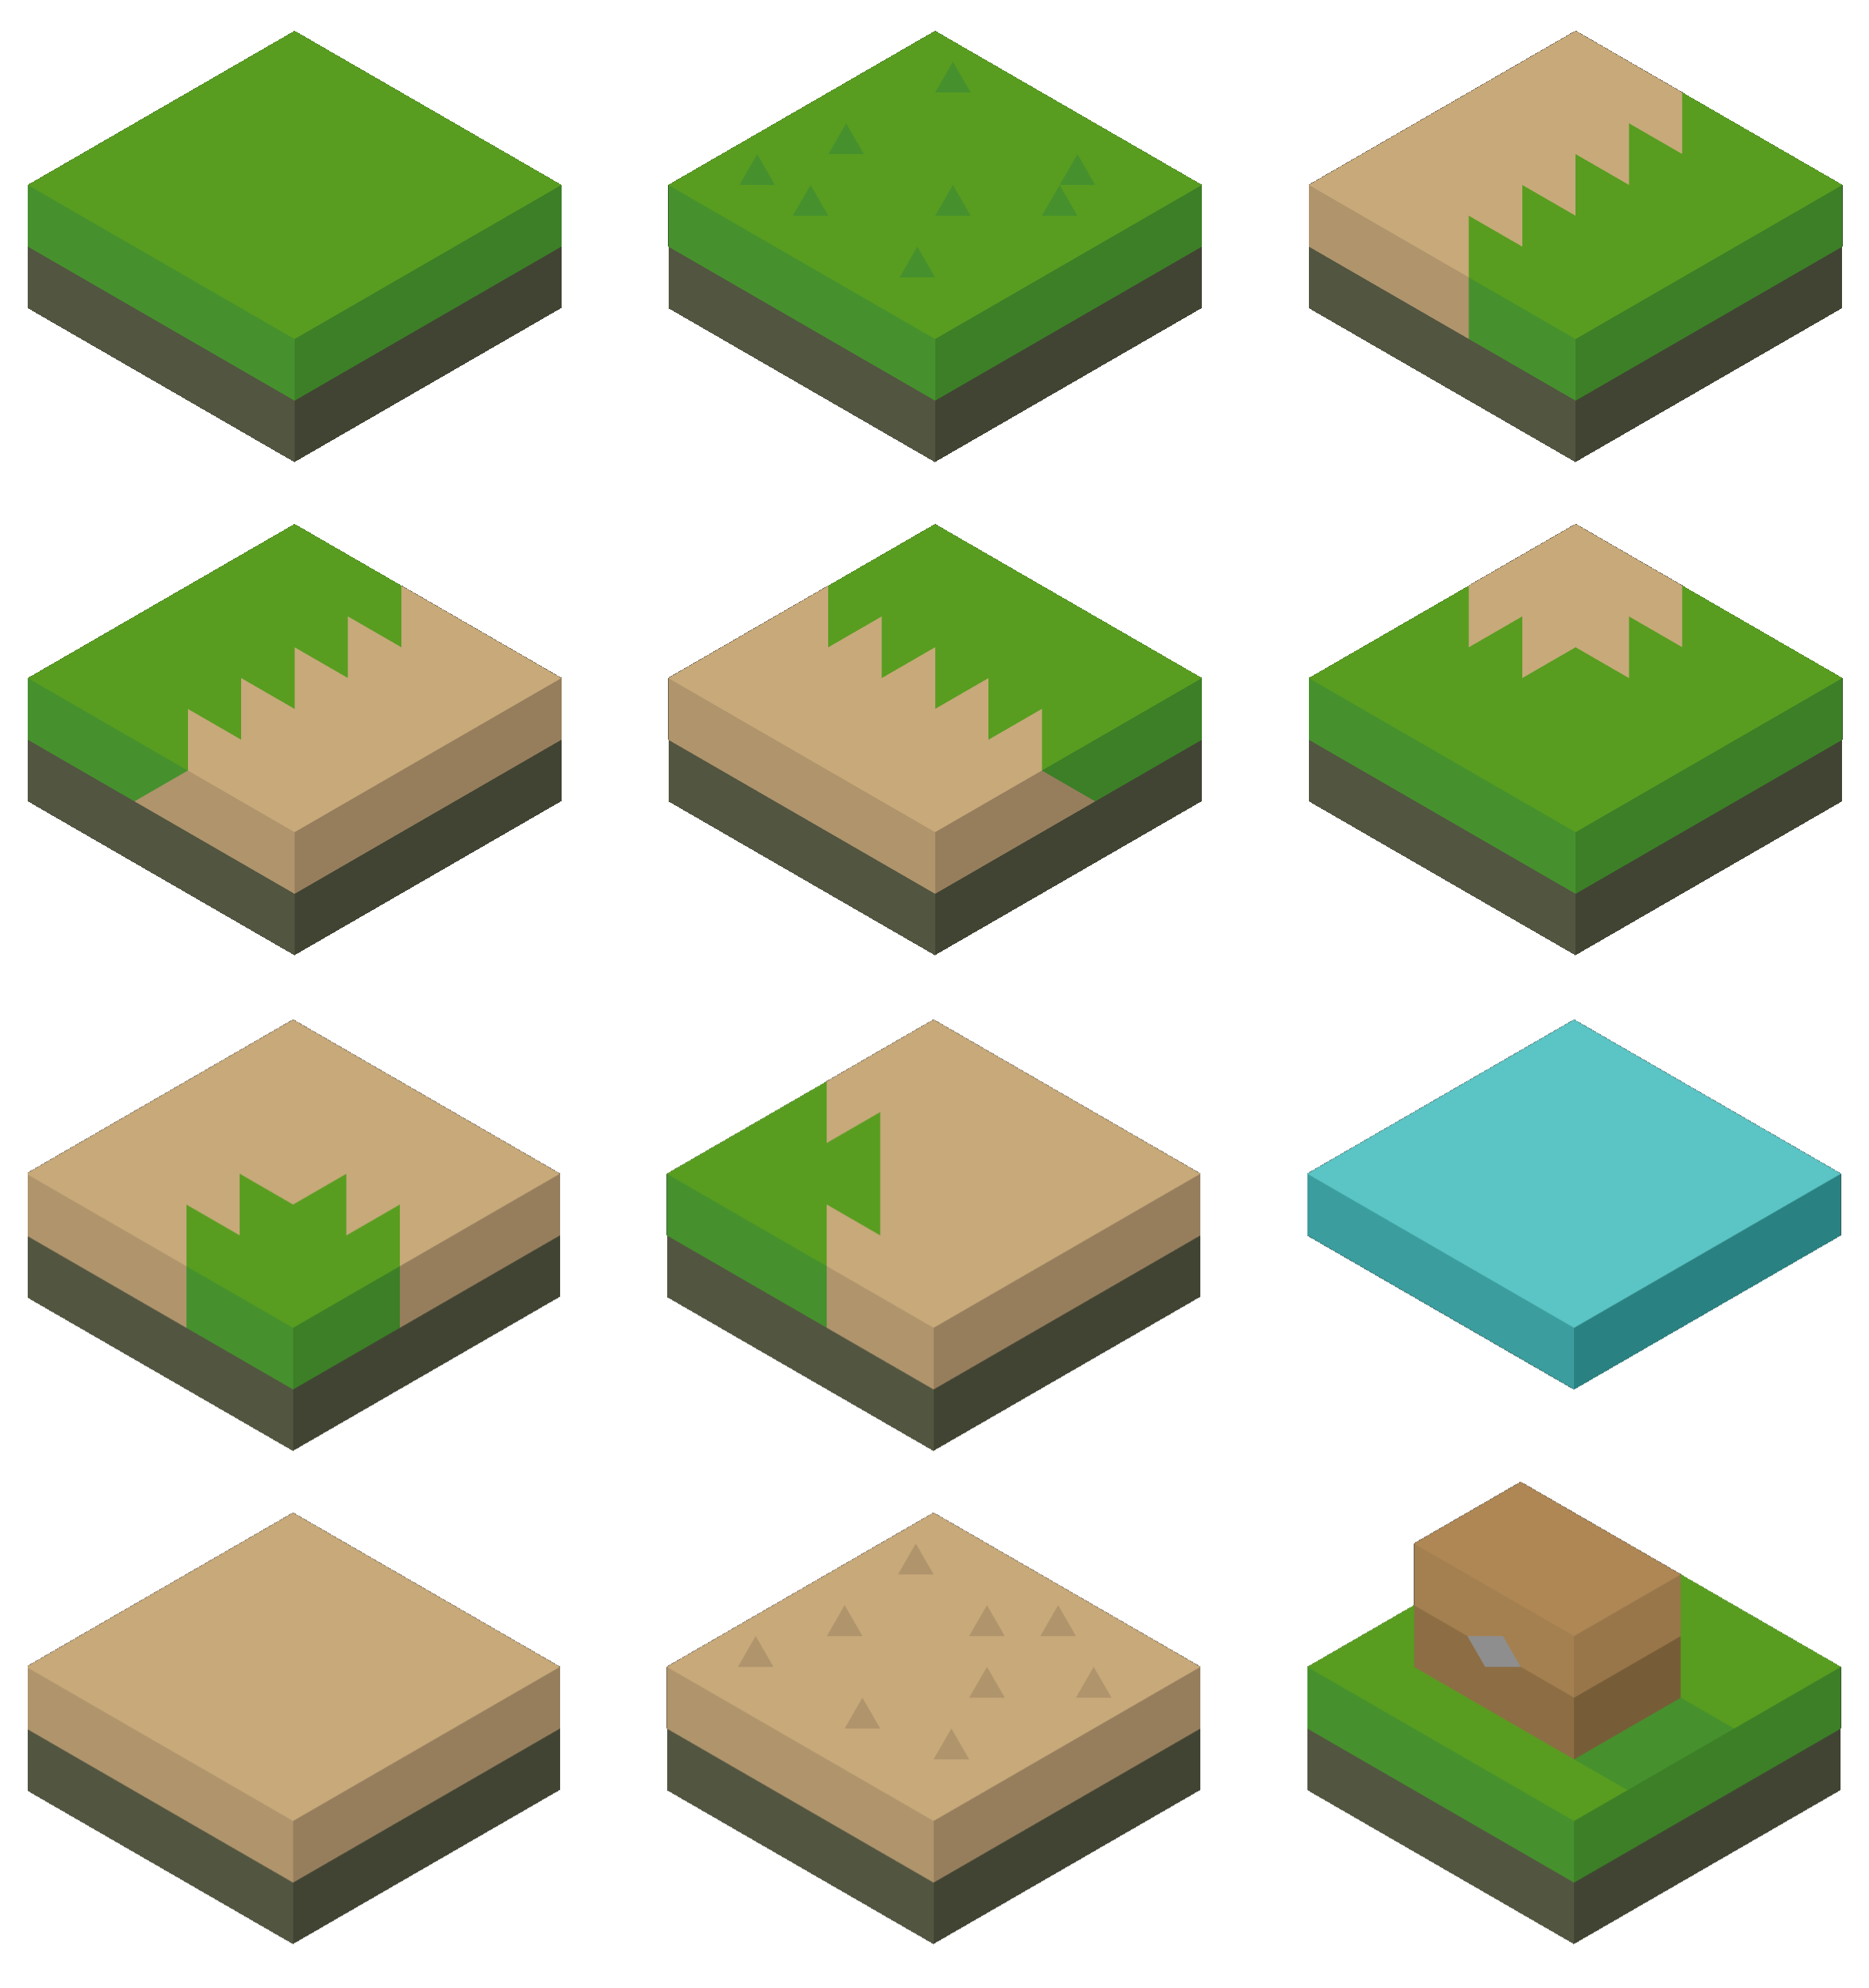
The public-domain set of tile images that I got from Kenney has some tiles that are taller than others. We'll need to offset them accordinly.

Let's load all the new 34 tile images with a for loop.
let grid = [
  [14, 23, 23, 23, 23, 23, 23, 23, 23, 13],
  [21, 32, 33, 33, 28, 33, 28, 33, 31, 20],
  [21, 34,  0,  0, 25, 33, 30,  1, 34, 20],
  [21, 34,  0,  0, 34,  1,  1, 10, 34, 20],
  [21, 25, 33, 33, 24, 33, 33, 33, 27, 20],
  [21, 34,  4,  7, 34, 18, 17, 10, 34, 20],
  [21, 34,  4,  7, 34, 16, 19, 10, 34, 20],
  [21, 34,  6,  8, 34, 10, 10, 10, 34, 20],
  [21, 29, 33, 33, 26, 33, 33, 33, 30, 20],
  [11, 22, 22, 22, 22, 22, 22, 22, 22, 12]
];

function setup() {
  createCanvas(windowWidth, windowHeight);
  for (let i = 0; i <= 34; i++) {
    tile_images.push(loadImage("./tiles/tile-" + i + ".png"));
  }
}
Now it's just a matter of defining what is the maximum possible tile height we can want, and offset the tiles up or down based on how tall each tile image is:
const MAX_TILE_HEIGHT = 80;

function draw_tile(img, x, y) {
  let x_screen = x_start + (x - y) * TILE_WIDTH/2;
  let y_screen = y_start + (x + y) * TILE_HEIGHT/2;

  let z_offset = MAX_TILE_HEIGHT - img.height;

  image(img, x_screen, y_screen + z_offset);
}
Well done! Let's call it a day.
If you want, you can view the final version of our code here.
Isometric Coordinates as Linear Transformations
As you can see, isometric games can be a great sandbox for us to play around with some very basic coding ideas, and the math behind converting grid coordinates into screen coordinates is relatively simple.
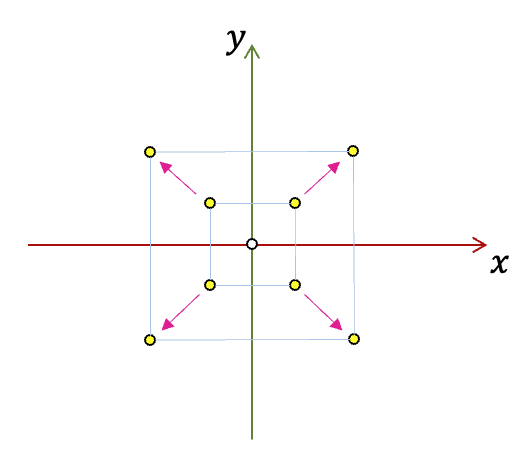
It's worth mentioning that I have seen books and articles describe isometric coordinates as linear transformations. We can think of a transformation that distorts the original grid skewing the original rectangular grid into an isometric result.
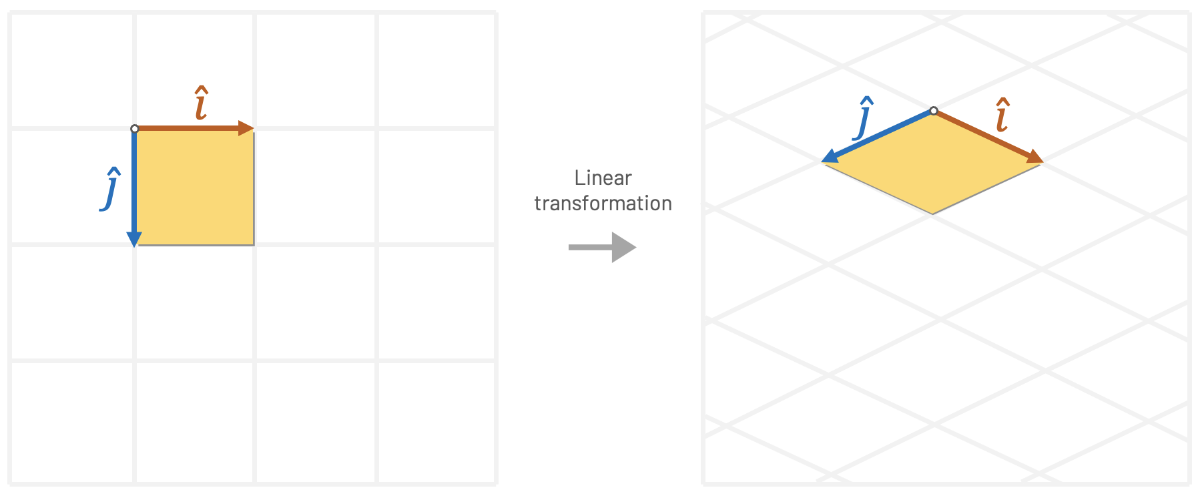
Such transformations can be represented using matrix multiplication, where we multiply x and y by the entries that perform the desired isometric distortion. In the example below, Tw and Th are the tile's width and height.
\( x \begin{pmatrix} 0.5 * T_w \\ 0.25 * T_h \end{pmatrix} + y \begin{pmatrix} -0.5 * T_w \\ 0.25 * T_h \end{pmatrix} \)
This animation created by Jordan West helps us visualize this isometric transformation:
One of the advantages of thinking in terms of linear transformations is that we could use mathematical tools to find the inverse of a transformation. Let's say, for example, that we want to select the tile that is under our mouse cursor. We need to find a way of going the other way around (going from screen space to grid space). We can achieve this undo operation by computing the inverse matrix of our last transformation.
Seeing beyond the matrix: This is super great and all, but at the end of the day it's just a generalization of what we were already doing. I want my students to always see beyond the matrix! All these "linear transformations" are basically just a fancy way of representing the same multiplications and additions that we were doing before.
If you ever took a course with me, you know that I love math and I always encourage my students to get comfortable with it. But if there's one thing I learned from retro game programming, is that sometimes the way math approaches problems goes against the way we should think of solving problems with a digital machine. At the end of the day, retro programming is about finding ways to cheat using code and finding simplifications that allow us to push fast pixels to the screen. Always keep things as simple as possible.
Famous Isometric Games
I've spent many hours playing isometric games in the past and some of them are very dear to my heart. Games like Populous, Ant Attack, Zaxxon, Marble Madness, Age of Empires, SimCity 2000, Syndicate, and Q*Bert are just some examples of titles that I remember playing back in the day.
One of my all time favorites is definitely RollerCoaster Tycoon, written by Chris Sawyer. Chris is one of the most famous developers in the world of isometric games. He coded both Transport Tycoon and RollerCoaster Tycoon using x86 assembly language.
Chris Sawyer started programming 8-bit games for the Memotech MTX computer. He used raw Z80 assembly to get some performance out of Memotech's 4 MHz CPU. After many games developed for the Memotech, Chris managed to get an Amstrad 1512. This is the start of his journey programming assembly for the Intel x86 CPU.
While the PC market was targeting mostly business applications, competitors like the Amiga and the Atari ST ruled the gaming market with colorful palettes and dedicated graphics chips. As the PC became more powerful, Chris developed the reputation of being an expert in x86 assembly. He helped port many (many!) games for the PC, like Virus, Dino Dini's Goal, and Frontier Elite II.
One of the big games written by Chris Sawyer was, of course, RollerCoaster Tycoon. Roller coasters were always a personal passion of Chris, and the game added physics simulation on top of the existing Transport Tycoon experience. To understand the level of detail and speed that Chris managed to squeeze using assembly, one of the levels of RollerCoaster Tycoon 2 was able to handle 4,500 guests for a single park!
This was a time where most other developers were already programming their games using high-level languages like C and C++. Chris' familiarity with assembly allowed him to push the limits of the 200 MHz CPUs of the time, as well as taking advantage of 640x480 VGA resolution by only changing the absolute minimum required per frame.
Chris was a monster x86 programmer, and what he achieved with these games is nothing short of amazing. I thought it was important to add a little bit of his history in an article about isometric games.
Conclusion and Moving Forward
Hopefully, you enjoyed this short trip into the world of isometric games. I always have fun discussing these topics.
I believe this article can be the starting point for more advanced isometric projects that you might have in mind. Of course, this is just the bare minimum for us to start entering the isometric mindset; things can get pretty hairy as we add more functionality to our isometric game, like animations, physics, input, etc.
I wanted this to be a super beginner-friendly article, and I think we covered the absolute basics of how isometric projection works and even coded a very small isometric tilemap using a simple scripting language.
And speaking of 3D games, I just want to mention that have a course that teaches 3D Graphics Programming. If you liked reading about isometric games, then I'm sure you'll enjoy my lectures. Many concepts that we just learned have everything to do with the topics you'll find in that course. Check it out!
If I forgot to mention your favorite game or if you have any suggestions for this article, you can follow me on Twitter and send me an angry message. But if you learned at least one interesting thing reading this article, then I guess the whole journey was worth it.
See you soon!